<?xml version="1.0" encoding="UTF-8"?>
<feed xmlns="http://www.w3.org/2005/Atom">
  <title><![CDATA[Jake McCrary's articles on tools]]></title>
  <link href="https://jakemccrary.com/atom.xml" rel="self"/>
  <link href="https://jakemccrary.com/"/>
  <updated>2026-03-14T17:06:03+00:00</updated>
  <id>https://jakemccrary.com/</id>
  <author>
    <name><![CDATA[Jake McCrary]]></name>
  </author>
  <entry>
    <id>https://jakemccrary.com/blog/notify-yourself-when-a-task-finishes/index.html</id>
    <link href="https://jakemccrary.com/blog/notify-yourself-when-a-task-finishes/index.html"/>
    <title><![CDATA[Notify yourself when a task finishes]]></title>
    <updated>2025-12-01T23:59:59+00:00</updated>
    <content type="html"><![CDATA[<div><p>If you&apos;ve got a ridiculously good memory and you&apos;ve been reading my writing for a while, you know I&apos;m a fan of processes <a href="/blog/categories/notifications/">notifying</a> you when they are done. I often have some task running in a hidden terminal that performs actions when files change. This is most often running Clojure tests whenever a file changes using either <a href="https://github.com/jakemcc/test-refresh">test-refresh</a> or <a href="https://github.com/jakemcc/lein-autoexpect">lein-autoexpect</a>. Another common watch task is rendering this website whenever one of the markdown files changes.</p><p>I don&apos;t like needing to have these processes always visible, since I mostly only care about when they finish. When running unit tests, I don&apos;t need to see the output unless a test is failing. When writing articles, I only care about when the rendering is done so I know I can refresh my browser to review the output.</p><p>On macOS, one way of doing this is using <a href="https://github.com/julienXX/terminal-notifier">terminal-notifier</a>. <code>terminal-notifier</code> makes it trivial to send notifications.</p><p>Below is the script I run while working on this website. It uses <code>entr</code> to monitor the input files; when changes are detected, it renders this site using my homegrown <a href="https://babashka.org/">Babashka</a> static site generator, and when that finishes, it uses <code>terminal-notifier</code> to alert me.</p><pre><code class="language-bash">#!/bin/bash
while sleep 0.5; do 
    rg bb templates source --files -t css -t clojure -t markdown -t html \
        | entr -d -s &apos;rm -rf output/*; bb render &amp;&amp; terminal-notifier -message &quot;Rendering complete&quot;&apos;;
done
</code></pre><p>This site renders quickly, so I can usually make some edits, save, and toggle to a browser to refresh and see the output. Still, it is nice to see that little notification pop-up on my screen so I know for sure that if I hit refresh, I&apos;m seeing the latest render.</p><p>When I&apos;m running my Clojure tests, both <code>lein-autoexpect</code> and <code>test-refresh</code> send a notification with a pass or fail message based on the status of the unit tests that just ran. If the tests are passing, I don&apos;t have to glance at my terminal. If they are failing, I do.</p><p>I&apos;d encourage you to think about what processes you might want to get notifications from when they are done and look into how to set that up. <code>terminal-notifier</code> works great on macOS. I can&apos;t make recommendations for other operating systems since it has been years since I&apos;ve used any alternatives besides SSHing into a Linux server.</p><p>It is worth the effort to figure out how to have notifications. They remove a trivial inconvenience (having to switch programs, needing to keep a window visible on your screen) and make life a little better. By stacking small, slightly life-improving techniques, all of a sudden you find yourself much more productive.</p></div>]]></content>
  </entry>
  <entry>
    <id>https://jakemccrary.com/blog/2020/08/31/utilities-i-like-selecta/index.html</id>
    <link href="https://jakemccrary.com/blog/2020/08/31/utilities-i-like-selecta/index.html"/>
    <title><![CDATA[Utilities I like: selecta]]></title>
    <updated>2020-08-31T23:59:59+00:00</updated>
    <content type="html"><![CDATA[<div><p><a href="https://github.com/garybernhardt/selecta">Selecta</a> is a command-line utility that gives you the power to fuzzy select items from a list of text. What does that mean? It means you pipe <code>selecta</code> a list of text on stdin, it helps you make a choice from items in that list, and then <code>selecta</code> prints that choice to stdout.</p><p>Here is an example of me using it to help me narrow in on what file I&apos;d like to pass to <code>wc</code>.</p><video autoplay loop muted playsinline>
  <source src="/images/selecta-search.webm" type="video/webm">
  <source src="/images/selecta-search.mp4" type="video/mp4">
</video><p>In this example, I search for markdown files using <code>ripgrep</code> (<code>rg</code>), type part of a filename, hit enter to select the match, and then see the <code>wc</code> stats of that file. This isn&apos;t the greatest example of using <code>selecta</code> but it adequately shows what it does.</p><p>Some number of years ago, I wrote a script called <code>connect-db</code>. This script used <code>selecta</code>, along with <code>grep</code>, <code>sed</code>, and <code>cut</code>, to provide a very pleasant command-line experience for connecting to known databases. My coworkers and I used this script frequently.</p><p>By combining <code>selecta</code> with other stdin/stdout friendly command-line tools you can build really enjoyable, time-saving tools. <a href="https://github.com/garybernhardt/selecta">Selecta</a> is a useful utility to add to your toolkit.</p></div>]]></content>
  </entry>
  <entry>
    <id>https://jakemccrary.com/blog/2020/02/25/auto-syncing-a-git-repository/index.html</id>
    <link href="https://jakemccrary.com/blog/2020/02/25/auto-syncing-a-git-repository/index.html"/>
    <title><![CDATA[Auto-syncing a git repository]]></title>
    <updated>2020-02-25T23:59:59+00:00</updated>
    <content type="html"><![CDATA[<div><p>I&apos;m currently keep notes on my computer using plain text and <a href="https://orgmode.org/">Org mode</a>.</p><p>I keep my notes in a git repository in my home directory, <code>~/org/</code>. I want my notes to be synced between my computers without me thinking about it. Historically, I&apos;ve reached for something like Google Drive or Dropbox to do this but this time I reached for git and GitHub.</p><p>Below is the script that I ended up cobbling together from various sources found online. The script pushes and pulls changes from a remote repository and works on my macOS and linux machines.</p><p>The loop starting on line 38 does the work. Whenever a file-watcher notices a change or 10 minutes passes, the loop pulls changes from a remote repository, commits any local changes, and pushes to the remote repository. The lines before this are mostly checking that needed programs exist on the host.</p><p>I keep this running in a background terminal and I check periodically to confirm it is still running. I could do something fancier but this isn&apos;t a critical system and the overhead of checking every couple days is nearly zero. Most of the time checking happens by accident when I accidentally maximize the terminal that runs the script.</p><p>I&apos;ve been using this script for a long time now and I&apos;ve found it quite useful. I hope you do too.</p><pre><code class="language-bash">#!/bin/bash

set -e

TARGETDIR=&quot;$HOME/org/&quot;

stderr () {
    echo &quot;$1&quot; &gt;&amp;2
}

is_command() {
    command -v &quot;$1&quot; &amp;&gt;/dev/null
}

if [ &quot;$(uname)&quot; != &quot;Darwin&quot; ]; then
    INW=&quot;inotifywait&quot;;
    EVENTS=&quot;close_write,move,delete,create&quot;;
    INCOMMAND=&quot;\&quot;$INW\&quot; -qr -e \&quot;$EVENTS\&quot; --exclude \&quot;\.git\&quot; \&quot;$TARGETDIR\&quot;&quot;
else # if Mac, use fswatch
    INW=&quot;fswatch&quot;;
    # default events specified via a mask, see
    # https://emcrisostomo.github.io/fswatch/doc/1.14.0/fswatch.html/Invoking-fswatch.html#Numeric-Event-Flags
    # default of 414 = MovedTo + MovedFrom + Renamed + Removed + Updated + Created
    #                = 256 + 128+ 16 + 8 + 4 + 2
    EVENTS=&quot;--event=414&quot;
    INCOMMAND=&quot;\&quot;$INW\&quot; --recursive \&quot;$EVENTS\&quot; --exclude \&quot;\.git\&quot; --one-event \&quot;$TARGETDIR\&quot;&quot;
fi

for cmd in &quot;git&quot; &quot;$INW&quot; &quot;timeout&quot;; do
    # in OSX: `timeout` =&gt; brew install coreutils
    # in OSX: `fswatch` =&gt; brew install fswatch
    is_command &quot;$cmd&quot; || { stderr &quot;Error: Required command &apos;$cmd&apos; not found&quot;; exit 1; }
done

cd &quot;$TARGETDIR&quot;
echo &quot;$INCOMMAND&quot;

while true; do
    eval &quot;timeout 600 $INCOMMAND&quot; || true
    git pull
    sleep 5
    STATUS=$(git status -s)
    if [ -n &quot;$STATUS&quot; ]; then
        echo &quot;$STATUS&quot;
        echo &quot;commit!&quot;
        git add .
        git commit -m &quot;autocommit&quot;
        git push origin
    fi
done
</code></pre></div>]]></content>
  </entry>
  <entry>
    <id>https://jakemccrary.com/blog/2019/01/27/how-to-display-a-message-to-all-tmux-clients/index.html</id>
    <link href="https://jakemccrary.com/blog/2019/01/27/how-to-display-a-message-to-all-tmux-clients/index.html"/>
    <title><![CDATA[How to display a message to all tmux clients]]></title>
    <updated>2019-01-27T23:59:59+00:00</updated>
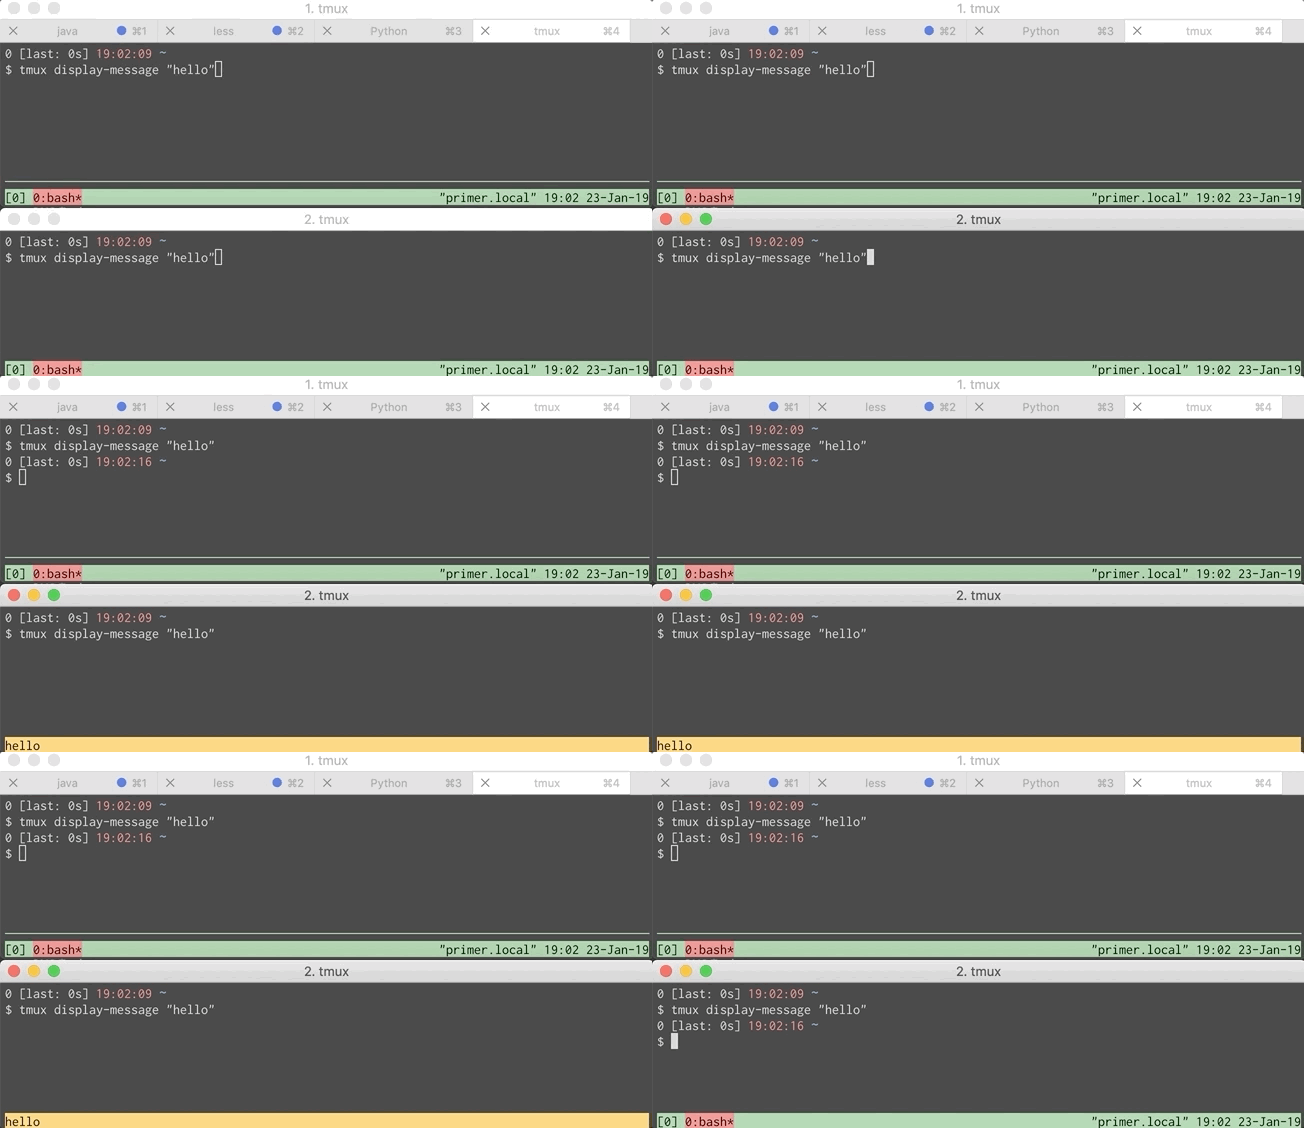
    <content type="html"><![CDATA[<div><!-- Estimated time: 30 minutes --><!-- First Draft: 26 minutes --><!-- First edits: 14 minutes --><p>Lately, I&apos;ve been using <a href="https://github.com/tmux/tmux">tmux</a> a lot. This resulted in me figuring out how to get <a href="https://github.com/jakemcc/test-refresh#notifications">lein-test-refresh</a> to send <a href="/blog/2019/01/06/notifications-with-tmux-and-lein-test-refresh/">notifications using tmux</a>.</p><p>The setup linked above works great for when I&apos;m doing work all by myself. It showed a problem when using ssh and tmux to pair with another developer. Instead of both developers receiving a notification, only one did. One is better than none but not ideal.</p><p>Below is a GIF showing the problem. Each window simulates a different developer.</p><p><img alt="tmux only showing one developer a notification" src="/images/tmux-pair-fail.gif" /></p><p>This wasn&apos;t too hard to fix. A little digging through the tmux manpage shows that <code>tmux display-message</code> takes an optional flag telling it which client receives the message. If we can get a list of all the clients then iterating over them and sending a message to each is straightforward.</p><p><code>tmux list-clients</code> give us this list. Below is the output.</p><pre><code>$ tmux list-clients
/dev/ttys002: 0 [78x41 xterm-256color] (utf8)
/dev/ttys006: 0 [78x42 xterm-256color] (utf8)
</code></pre><p>What we care about are the parts that look like <code>/dev/ttys002</code>. At first I used <code>cut</code> to grab these values but then I dug a bit deeper into the <code>tmux</code> manpage.</p><p>It turns out that you can specify a format to <code>tmux list-clients</code>. Running <code>tmux list-clients -F &quot;#{client_name}&quot;</code> gives us the output we care about.</p><pre><code>$ tmux list-clients -F &quot;#{client_name}&quot;
/dev/ttys002
/dev/ttys006
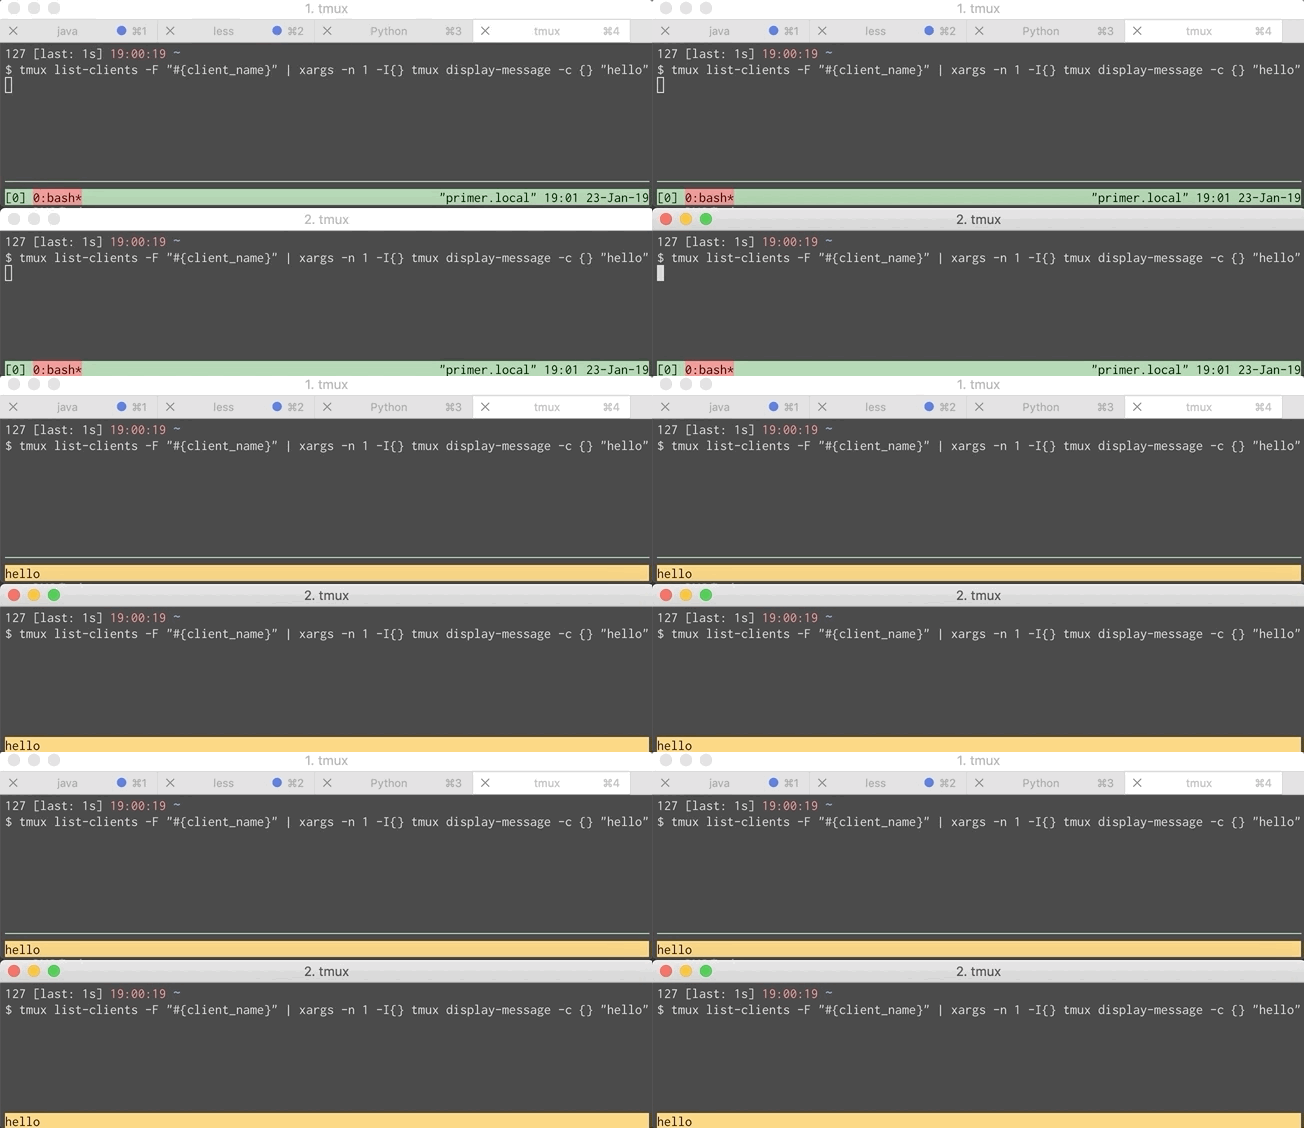
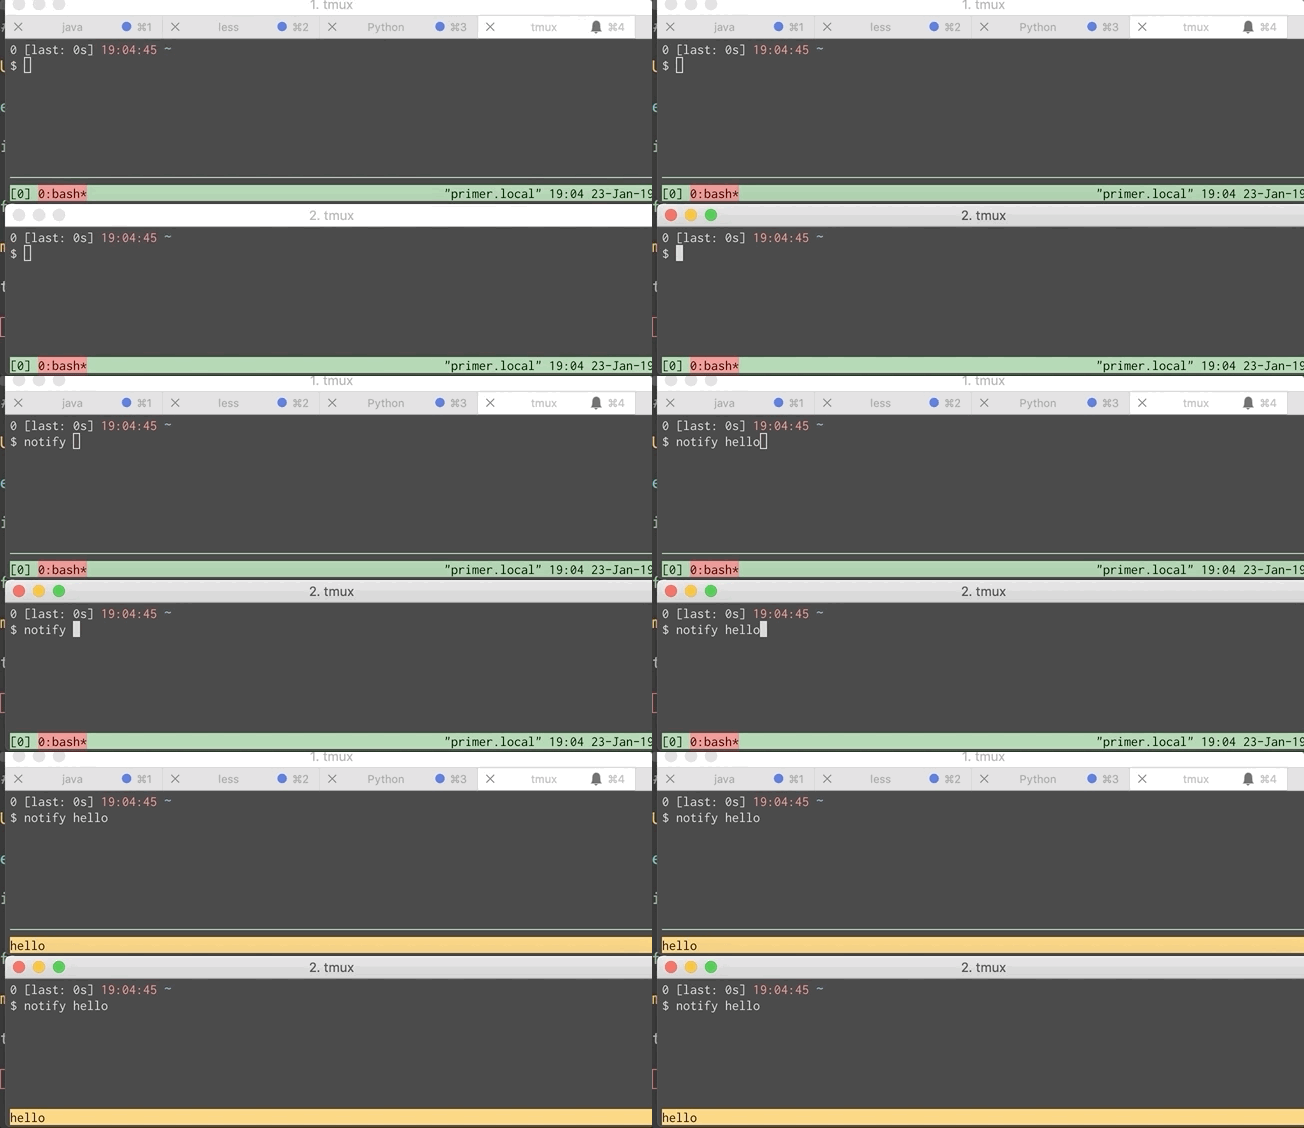
</code></pre><p>We can combine that with <code>xargs</code> to send a message to multiple clients.</p><p><img alt="tmux xargs example" src="/images/tmux-xargs-example.gif" /></p><p>That command is a bit much to put into <code>lein-test-refresh</code>&apos;s configuration so I shoved it in a script called <code>notify</code> and configured <code>lein-test-refresh</code> to use it. Script and GIF of that below. Now both you and your pair can get notifications.</p><pre><code class="language-bash">#!/bin/bash

USAGE=&quot;Usage: notify &lt;message&gt;

example: notify &apos;Tests passed!&apos;&quot;

if [ -z &quot;$1&quot; ]; then
    echo &quot;$USAGE&quot;
    exit 1
fi

message=&quot;$1&quot;

tmux list-clients -F &quot;#{client_name}&quot; \
    | xargs -n1 -I{} tmux display-message -c {} &quot;$message&quot;
</code></pre><p><img alt="Example using notify script" src="/images/tmux-notify-script.gif" /></p></div>]]></content>
  </entry>
  <entry>
    <id>https://jakemccrary.com/blog/2019/01/06/notifications-with-tmux-and-lein-test-refresh/index.html</id>
    <link href="https://jakemccrary.com/blog/2019/01/06/notifications-with-tmux-and-lein-test-refresh/index.html"/>
    <title><![CDATA[Notifications with tmux and lein-test-refresh]]></title>
    <updated>2019-01-06T23:59:59+00:00</updated>
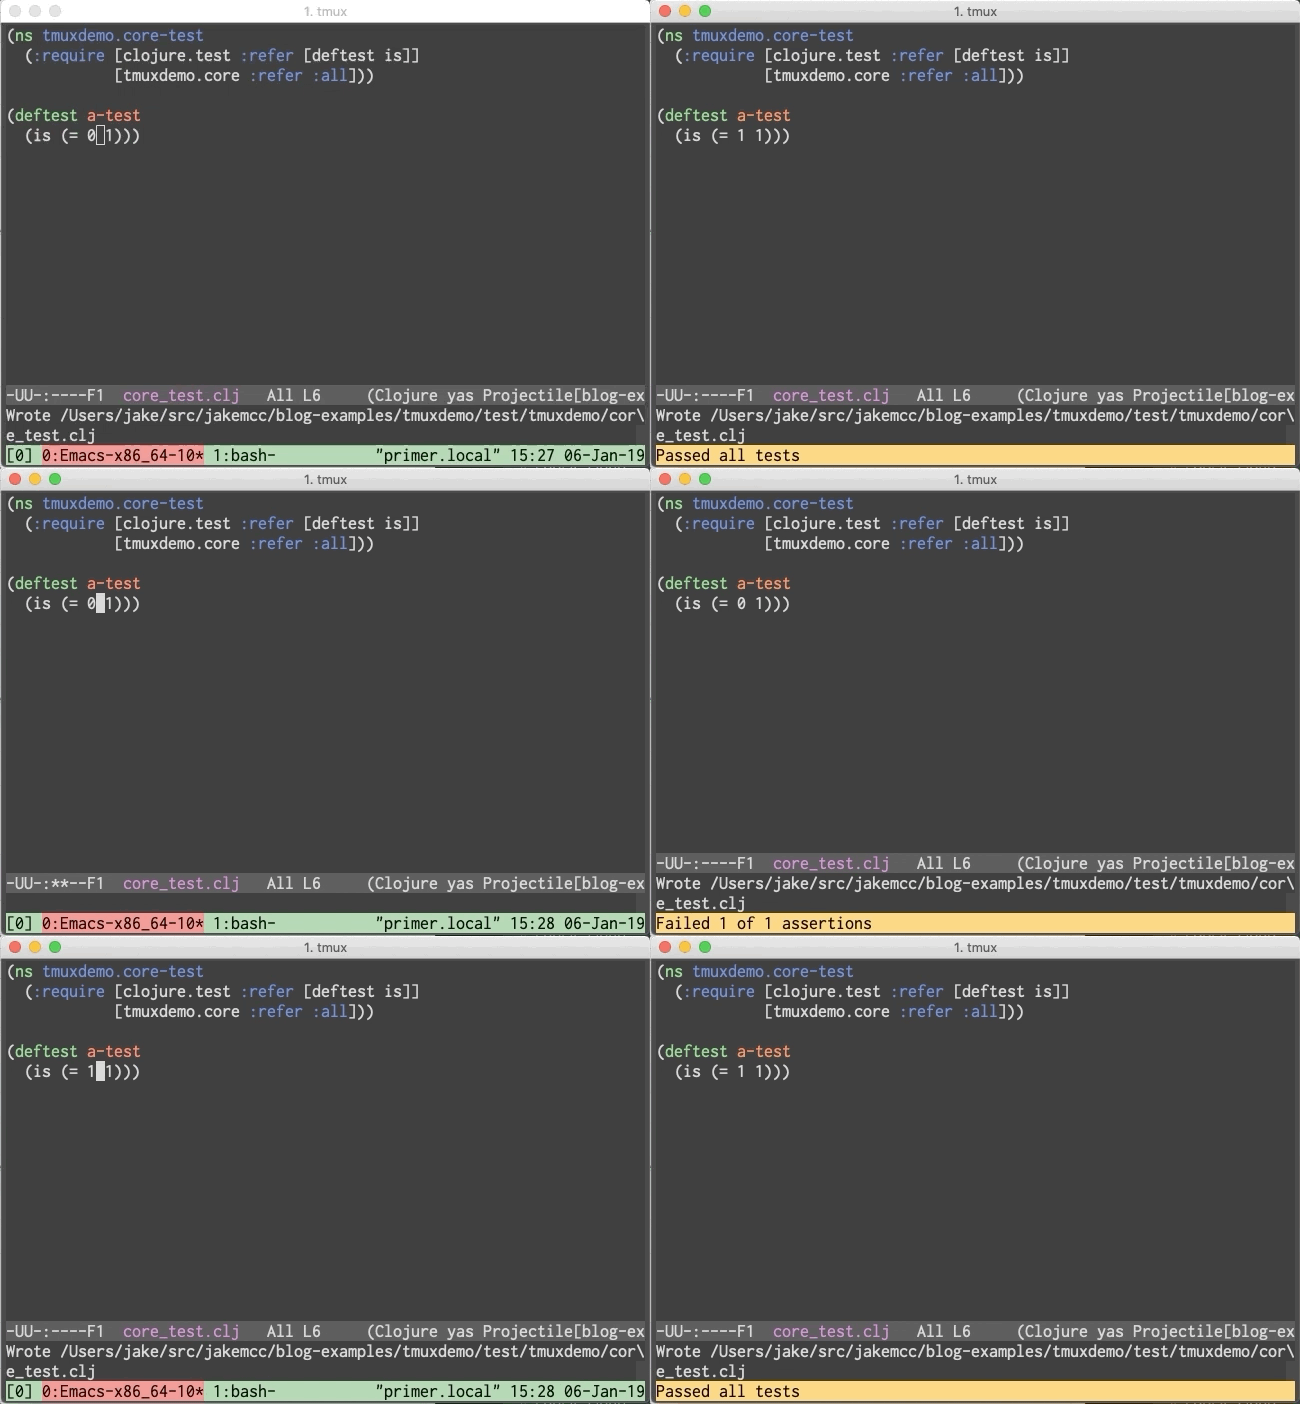
    <content type="html"><![CDATA[<div><p>I&apos;ve been using Emacs in a remote <a href="https://github.com/tmux/tmux">tmux</a> session lately and I&apos;ve been missing <a href="https://github.com/jakemcc/test-refresh#notifications">lein-test-refresh</a> notifications when my Clojure tests pass or fail. Luckily, it only took me a little bit of searching to figure out a solution for when I&apos;m working inside of tmux.</p><p>Below is a GIF of the notifications I get as my tests run and pass or fail.</p><p><img alt="tmux and test-refresh notifications" src="/images/tmux-test-refresh.gif" title="tmux and test-refresh notifications" /></p><p>With the above notifications, I can keep my focus on my code and only switch to the tmux window with <code>lein test-refresh</code> running when a test fails.</p><p>This was pretty easy to setup. You can trigger a message in tmux by running <code>tmux display-message &lt;MESSAGE_HERE&gt;</code>. To configure <a href="https://github.com/jakemcc/test-refresh#notifications">lein-test-refresh</a> to send notifications to tmux simply include the following in your <code>:test-refresh</code> section of your <code>project.clj</code> or <code>profiles.clj</code>.</p><pre><code class="language-clojure">:test-refresh {:notify-command [&quot;tmux&quot; &quot;display-message&quot;]}
</code></pre><p>I hope you enjoy this. Its has made using a remote terminal with tmux and <a href="https://github.com/jakemcc/test-refresh">lein-test-refresh</a> more enjoyable.</p></div>]]></content>
  </entry>
  <entry>
    <id>https://jakemccrary.com/blog/2017/05/29/using-comm-to-verify-matching-content/index.html</id>
    <link href="https://jakemccrary.com/blog/2017/05/29/using-comm-to-verify-matching-content/index.html"/>
    <title><![CDATA[Using comm to verify file content matches]]></title>
    <updated>2017-05-29T23:59:59+00:00</updated>
    <content type="html"><![CDATA[<div><p>I recently found myself in a situation where I needed to confirm that a process took in a tab separated file, did some processing, and then output a new file containing the original columns with some additional ones. The feature I was adding allowed the process to die and restart while processing the input file and pick up where it left off.</p><p>I needed to confirm the output had data for every line in the input. I reached to the command line tool <code>comm</code>.</p><p>Below is a made up input file.</p><pre><code>UNIQUE_ID	USER
1	38101838
2	19183819
3	19123811
4	10348018
5	19881911
6	29182918
</code></pre><p>And here is some made up output.</p><pre><code>UNIQUE_ID	USER	MESSAGE
1	38101838	A01
2	19183819	A05
3	19123811	A02
4	10348018	A01
5	19881911	A02
6	29182918	A05
</code></pre><p>With files this size, it would be easy enough to check visually. In my testing, I was dealing with files that had thousands of lines. This is too many to check by hand. It is a perfect amount for <code>comm</code>.</p><p><a href="https://en.wikipedia.org/wiki/Comm">comm</a> reads two files as input and then outputs three columns. The first column contains lines found only in the first file, the second column contains lines only found in the second, and the last column contains lines in both. If it is easier for you to think about it as set operations, the first two columns are similar to performing two set differences and the third is similar to set intersection. Below is an example adapted from Wikipedia showing its behavior.</p><pre><code>$ cat foo.txt
apple
banana
eggplant
$ cat bar.txt
apple
banana
banana
zucchini
$ comm foo.txt bar.txt
                  apple
                  banana
          banana
eggplant
          zucchini
</code></pre><p>So how is this useful? Well, you can also tell <code>comm</code> to suppress outputting specific columns.  If we send the common columns from the input and output file to <code>comm</code> and suppress <code>comm</code>&apos;s third column then anything printed to the screen is a problem. Anything printed to the screen was found in one of the files and not the other. We&apos;ll select the common columns using cut and, since comm expects input to be sorted, then sort using <code>sort</code>. Let&apos;s see what happens.</p><pre><code>$ comm -3 &lt;(cut -f 1,2 input.txt | sort) &lt;(cut -f 1,2 output.txt | sort)
$
</code></pre><p>Success! Nothing was printed to the console, so there is nothing unique in either file.</p><p><code>comm</code> is a useful tool to have in your command line toolbox.</p></div>]]></content>
  </entry>
  <entry>
    <id>https://jakemccrary.com/blog/2016/09/28/better-command-history-in-your-shell/index.html</id>
    <link href="https://jakemccrary.com/blog/2016/09/28/better-command-history-in-your-shell/index.html"/>
    <title><![CDATA[Better command history in your shell]]></title>
    <updated>2016-09-28T23:59:59+00:00</updated>
    <content type="html"><![CDATA[<div><p>My ideal command history would let me search the history of every shell but when I hit the up arrow it would only cycle through my current shell&apos;s history. In February, I was able to achieve this setup in large part because of a utility called <a href="https://github.com/dvorka/hstr">hstr</a>.</p><h2 id="what-is-hstr?">What is <code>hstr</code>?</h2><p>hstr is a neat Bash and Zsh utility that lets you easily search, view, and manage your command history. hstr provides a tool named <code>hh</code> that provides a text interface for manipulating your command history. To see what it looks like check out the <a href="https://github.com/dvorka/hstr/blob/master/README.md">README</a> and this <a href="https://www.youtube.com/watch?v=sPF29NyXe2U">video</a> tutorial. If you are running OS X and use Homebrew you can install it by running <code>brew install hh</code>.</p><h2 id="making-global-history-searchable-but-arrows-cycle-through-local-history">Making global history searchable but arrows cycle through local history</h2><p>hstr is a neat tool but my favorite part of my setup is how the global command history is searchable but only a shell&apos;s local history is cycled through with the arrow keys. This is achieved by manipulating where history is written and tweaking some environment variables.</p><p>The first step is to change your <code>$PROMPT_COMMAND</code> to append your shell&apos;s history to a global history file. Below is the snippet that does this from my <code>.bashrc</code> file.</p><pre><code># Whenever a command is executed, write it to a global history
PROMPT_COMMAND=&quot;history -a ~/.bash_history.global; $PROMPT_COMMAND&quot;
</code></pre><p>The next step is to bind a keystroke to run <code>hh</code>, which is what hstr provides, with <code>$HISTFILE</code> pointing to <code>~/.bash_history.global</code>. I wanted to fully replace the default command history searching (and I use Emacs style keyboard shortcuts) so I&apos;ve bound these actions to ctrl-r.</p><pre><code class="language-bash"># On C-r set HISTFILE and run hh
bind -x &apos;&quot;\C-r&quot;: &quot;HISTFILE=~/.bash_history.global hh&quot;&apos;
</code></pre><p>With those two additions to my <code>.bashrc</code> I&apos;ve achieved my ideal command history searching. When I hit ctrl-r I&apos;m searching all of my history and yet I only cycle through a shell&apos;s local history with the arrow keys. This small addition<a href="#fn-1" id="fnref1"><sup>1</sup></a> made my command line productivity higher.</p><ol class="footnotes"><li class="footnote" id="fn-1"><p>My setup was inspired by <a href="https://unix.stackexchange.com/questions/200225/search-history-from-multiple-bash-session-only-when-ctrl-r-is-used-not-when-a">this</a> StackExchange post.<a href="#fnref1">↩</a></p></li></ol></div>]]></content>
  </entry>
</feed>