Jake McCrary

Creating a custom Kindle dictionary

Back in April 2013, I created and published a custom Kindle dictionary for the book Dune. As far as I can tell, my Dune dictionary was the very first custom Kindle dictionary for a fiction book.

I created it because I was reading Dune for the first time and there were many unfamiliar words. These words could not be looked up by my Kindle because they were not found in any of on-device dictionaries. These words were in Dune’s glossary but flipping back-and-forth to that on a Kindle was a huge pain.

I initially worked around this by printing a word list from Wikipedia and carrying it with me. This was better but it was still annoying.

I was so annoyed that I took a break from reading to figure out how to create a custom Kindle dictionary. At the time, there wasn’t a ton of great information online about how to do this.

Eventually, I found Amazon’s Kindle Publishing Guidelines and, referencing it, managed to figure out something that worked. The link in the previous sentence is to the current documentation which is much nicer than the mid-2013 documentation. The earlier documentation left me with questions and required quite a bit of experimentation.

Using the mid-2013 documentation, I developed some Clojure code to generate my dictionary. Doing this in 2013 was annoying. The documentation was not good.

I recently read Greg Egan’s Diaspora and found myself wishing I had a custom dictionary. I took a break from reading and packaged up Diaspora’s glossary into a dictionary. I could have stuck with my 2013 generator but I decided to update it and write this article about creating a Kindle dictionary in late 2020.

The new documentation is a bit better but it still isn’t great. Here is what you need to do.

Making a dictionary

Below are the steps to building a dictionary.

  1. Construct your list of words and definitions.
  2. Convert the list into the format specified by Amazon.
  3. Create a cover page.
  4. Create a copyright page.
  5. Create a usage page (definitely optional).
  6. Make an .opf file.
  7. Combine the files together.
  8. Put it onto your device.

1. Construct your list of words and definitions

There really are no set instructions for this. Source your words and definitions and store them in some format that you’ll be able to manipulate in a programming language.

I’ve sourced words a few different ways. I’ve taken them straight from a book’s glossary, a Wikipedia entry, and extracted them from a programming book’s source code.

2. Convert the list into the format specified by Amazon

Below is the basic scaffolding of the html file Amazon requires along with some inline styles that I think look decent on devices. This has some extra stuff in it and also doesn’t contain everything Amazon specifies. But it works.

1
2
3
4
5
6
7
8
9
10
11
12
13
14
15
16
17
18
19
20
21
22
23
24
25
26
27
28
29
30
31
32
<html xmlns:math="http://exslt.org/math" xmlns:svg="http://www.w3.org/2000/svg"
      xmlns:tl="https://kindlegen.s3.amazonaws.com/AmazonKindlePublishingGuidelines.pdf"
      xmlns:saxon="http://saxon.sf.net/" xmlns:xs="http://www.w3.org/2001/XMLSchema"
      xmlns:xsi="http://www.w3.org/2001/XMLSchema-instance"
      xmlns:cx="https://kindlegen.s3.amazonaws.com/AmazonKindlePublishingGuidelines.pdf"
      xmlns:dc="http://purl.org/dc/elements/1.1/"
      xmlns:mbp="https://kindlegen.s3.amazonaws.com/AmazonKindlePublishingGuidelines.pdf"
      xmlns:mmc="https://kindlegen.s3.amazonaws.com/AmazonKindlePublishingGuidelines.pdf"
      xmlns:idx="https://kindlegen.s3.amazonaws.com/AmazonKindlePublishingGuidelines.pdf">
  <head>
    <meta http-equiv="Content-Type" content="text/html; charset=utf-8">
    <style>
      h5 {
          font-size: 1em;
          margin: 0;
      }
      dt {
          font-weight: bold;
      }
      dd {
          margin: 0;
          padding: 0 0 0.5em 0;
          display: block
      }
    </style>
  </head>
  <body>
    <mbp:frameset>
      [PUT THE WORDS HERE]
    </mbp:frameset>
  </body>
</html>

The [PUT THE WORDS HERE] part gets filled in with the markup for all of your words. The basic structure for an entry looks like the following.

1
2
3
4
5
<idx:entry name="default" scriptable="yes" spell="yes">
  <h5><dt><idx:orth>WORD HERE</idx:orth></dt></h5>
  <dd>DEFINITION</dd>
</idx:entry>
<hr/>

Every word has an <idx:entry> block followed by a <hr>. These two elements together comprise a single entry.

The name attribute on the <idx:entry> element sets the lookup index associated with the entry. Unless you are building a dictionary with multiple indexes, you can pretty much ignore it. Whatever value is provided needs to match the value found in the .opf file we’ll make later.

The scriptable attribute makes the entry available from the index and can only have the value "yes". The spell can also only be "yes" and enables wildcard search and spell correction.

The markup you use inside the idx:entry element is mostly up to you. The only markup you need is the <idx:orth> node. Its content is the word being looked up. The rest of the markup can be whatever you want.

I wrap the term in a dt and the definition in dd because it just feels like the right thing to do and provides tags to put some CSS styles on. I wrap the dt element in an h5 because I couldn’t figure out what CSS styles would actually work on my Kindle voyage to put the term on its own line.

It isn’t that I don’t know what the styles should be but my Kindle did not respect them. Figuring out stuff like this is part of the experimentation required to produce a dictionary that you’re happy with.

There is additional supported markup that provides more functionality. This includes providing alternative words that all resolve to the same entry, specifying if an exact match is required, and varying the search word from the displayed word. Most dictionaries don’t need these features so I’m not going to elaborate on them.

3. Construct a cover page.

This is just a requirement of a Kindle. Create a html file called cover.html and substitute in the appropriate values.

1
2
3
4
5
6
7
8
9
<html>
  <head>
    <meta content="text/html" http-equiv="content-type">
  </head>
  <body>
    <h1>Dune Dictionary</h1>
    <h3>Created by Jake McCrary</h3>
  </body>
</html>

Amazon wants you to provide an image as well but you don’t actually have to do this. You probably need to do this if you actually publish the dictionary through Amazon1.

4. Create a copyright page

This is also a requirement of the Kindle publishing guide. There isn’t any special markup for doing this.

Just make another html file and fill in some appropriate details.

5. Create a usage page

This isn’t a requirement but I include another page that explains how to use the dictionary. Again, this is just a html document with some content in it.

6. Make an .opf file.

This is one of the poorly documented but extremely important parts of making a Kindle dictionary. This is a XML file that ties together all the previous files into an actual dictionary.

Make an opf file and name it whatever you want; in this example we’ll go with dict.opf.

Below is the one I’ve used for the Diaspora dictionary. If you’ve created an image for a cover then lines 7 and 15 are the important and line 15 should be uncommented.

1
2
3
4
5
6
7
8
9
10
11
12
13
14
15
16
17
18
19
20
21
22
23
24
25
26
27
28
29
30
31
32
33
34
35
36
37
38
<?xml version="1.0"?>
<package version="2.0" xmlns="http://www.idpf.org/2007/opf" unique-identifier="BookId">
  <metadata>
    <dc:title>A dictionary for Diaspora by Greg Egan</dc:title>
    <dc:creator opf:role="aut">Jake McCrary</dc:creator>
    <dc:language>en-us</dc:language>
    <meta name="cover" content="my-cover-image" />
    <x-metadata>
      <DictionaryInLanguage>en-us</DictionaryInLanguage>
      <DictionaryOutLanguage>en-us</DictionaryOutLanguage>
      <DefaultLookupIndex>default</DefaultLookupIndex>
    </x-metadata>
  </metadata>
  <manifest>
    <!-- <item href="cover-image.jpg" id="my-cover-image" media-type="image/jpg" /> -->
    <item id="cover"
          href="cover.html"
          media-type="application/xhtml+xml" />
    <item id="usage"
          href="usage.html"
          media-type="application/xhtml+xml" />
    <item id="copyright"
          href="copyright.html"
          media-type="application/xhtml+xml" />
    <item id="content"
          href="content.html"
          media-type="application/xhtml+xml" />
  </manifest>
  <spine>
    <itemref idref="cover" />
    <itemref idref="usage" />
    <itemref idref="copyright"/>
    <itemref idref="content"/>
  </spine>
  <guide>
    <reference type="index" title="IndexName" href="content.html"/>
  </guide>
</package>

An import element in this file is the <DefaultLookupIndex> element. The <DefaultLookupIndex> content needs to contain the same value from the name attribute on your <idx:entry> elements. The <DictionaryInLanguage> and <DictionaryOutLanguage> tell the Kindle the valid languages for your dictionary.

The other elements in the <metadata> should be pretty self-explanatory.

The <manifest> gives identifiers for the various files you’ve made in the previous steps

The commented out <img> shows how you’d add the cover image if you opt to have one. For sideloading dictionaries onto Kindles, it is not required.

The <spine> section references the <item>s from the <manifest> and specifies the order they appear in your book.

I honestly don’t remember why the <guide> section is in there or what it is doing in this example. I’m guessing that is what causes there to be an index with the word list in the dictionary but I haven’t tried removing it and the documentation doesn’t talk about it. I only have it there since I had it in earlier dictionaries I made.

7. Combine the files together

The publishing guidelines (as of October 2020) tell you to combine the previously created files together using the command line tool kindlegen. The problem with those instructions is that Amazon doesn’t offer kindlegen as a download anymore. If you want to use it, you can still find it through the Internet Archive.

Instead of following the publishing guidelines, we’ll use Kindle Previewer to finish making the dictionary. It is pretty straight forward.

  1. Download the Kindle Previewer application.
  2. Open it up and click File > Open.
  3. Find your dict.opf file and open that.
  4. File > Export and export it as a .mobi file.

The conversion log will complain about a couple things such as missing cover. As long as these are just Warnings it doesn’t matter.

I’ve found the preview in this app doesn’t match what it looks like on your device so take it with a grain of salt.

7. Put it onto your device

Finally, put the dictionary onto your Kindle. You can do this by either using a USB cable or by emailing it to your Kindle’s email address.

Once it is on your Kindle, open it up and double check that the formatting is correct. Next, open the book you’ve made it for and try looking up a word. If the lookup fails or uses another dictionary, click the dictionary name in the pop-up to change your default dictionary to yours. Now when you try to look up a word, your dictionary is searched first.

The great thing is that if a word isn’t in your dictionary then the Kindle searches the other dictionaries2. This feature is great as it lets your dictionary be very focused. Hopefully Amazon doesn’t remove this feature.

End

It was interesting creating another dictionary so long after I made my first couple. Some of the new features, like the ability to require an exact word match, would have been useful for my second dictionary. The actual markup recommendations have changed over the years but luckily my Dune dictionary still works. I’m not constantly checking that it works, so if Amazon had changed something and it broke, I probably wouldn’t notice until someone reported it.

The Kindle documentation is much better now compared to 2013 but it still isn’t great.

It is also a bummer that kindlegen is gone. It was nice to be able to convert the input files from the command line. I also think this means you can no longer make a dictionary from a Linux machine as I don’t remember seeing Kindle Previewer support.

If you’re ever in a situation where you think a custom dictionary would be useful, feel free to reach out.

Go forth and make dictionaries.

  1. This is actually a challenge to do due to restrictions on what Amazon allows published.
  2. No idea if it searches all of them in some order but I’m very glad it works this way.

Go create silly, small programs

Over the summer, I developed a couple of small, sort of silly programs. One, Photo Fit, is a little tool that runs in a web browser and resizes photos to fit as your phone’s background. The other, Default Equipment, runs on Heroku and automates changing the “bike” of my Strava-tracked e-bike rides to be my onewheel.

These weren’t created to solve large problems in the world. There is no plan to make any money with them. As of October 2020, Default Equipment doesn’t even work for other people (though it could, send me a message if you’d like to use it and I’ll get around to it).

Each was created to fix a minor annoyance in my life and, because these tools can live on the Internet, they can fix the same minor annoyance in other lives.

With an increasing amount of software in the world, being able to write software is nearly sorcery1. As a developer, you can identify a problem in the world and then change the world to remove that problem. And, depending on the problem, you can remove it for everyone else.

Software developers aren’t alone in being able to identify problems and remove them through creation. Carpenters can build shelves for their books. Cooks can prepare food to remove hunger. You can come up with nearly an infinite number of other examples.

The difference is that a solo developer can solve problems for an unknown number of other folks. This is enabled by the Internet enabled ease of distribution. This is very powerful.

Developers can expose their solution to others through a web application. Desktop or mobile applications can be distributed through various app stores or made available as a download. Source code can be made available for others to run. Being able to distribute easily and cheaply is a game changer.

A developer’s change to the world might be a minor improvement. Photo Fit might never be used by anyone besides me. But it is still out there, making the world slightly better. It is available for someone to stumble upon when they are also annoyed by the same problem.

It felt good to write these tiny, useful programs. If you scope them small enough, there is a definitive ending point2. This lets you feel that finishing-a-project satisfaction quickly. The small size also allows you experiment with new techniques and tools without committing to a large and ongoing commitment.

I wrote both Photo Fit and Default Equipment in TypeScript. Before the beginning of summer, I didn’t know TypeScript and had little exposure to Node.js. Now I have some experience with both and gained that while making small improvements to my life and potentially the lives of others.

If you haven’t developed software to solve a small problem recently, I’d recommend doing it. Don’t hesitate to remove a problem that feels silly. Removing those problems can still make your life slightly better and gives you an opportunity to learn. It feels good to remove an annoyance from your life. If you can, make that software available to others so their lives are improved as well. Take advantage of the power of easy distribution to improve the world and not just your tiny slice of it.


  1. This is taken to an extreme in the fantasy series Magic 2.0.
  2. Excluding any ongoing maintenance. But if you’re making something small enough you can approach near zero ongoing maintenance. One of my longest running solve-my-own-problems application, Book Robot, has been operating for nearly 7 years with minimal effort.

Utilities I like: selecta

Selecta is a command-line utility that gives you the power to fuzzy select items from a list of text. What does that mean? It means you pipe selecta a list of text on stdin, it helps you make a choice from items in that list, and then selecta prints that choice to stdout.

Here is an example of me using it to help me narrow in on what file I’d like to pass to wc.

In this example, I search for markdown files using ripgrep (rg), type part of a filename, hit enter to select the match, and then see the wc stats of that file. This isn’t the greatest example of using selecta but it adequately shows what it does.

Some number of years ago, I wrote a script called connect-db. This script used selecta, along with grep, sed, and cut, to provide a very pleasant command-line experience for connecting to known databases. My coworkers and I used this script frequently.

By combining selecta with other stdin/stdout friendly command-line tools you can build really enjoyable, time-saving tools. Selecta is a useful utility to add to your toolkit.

Introducing Photo Fit

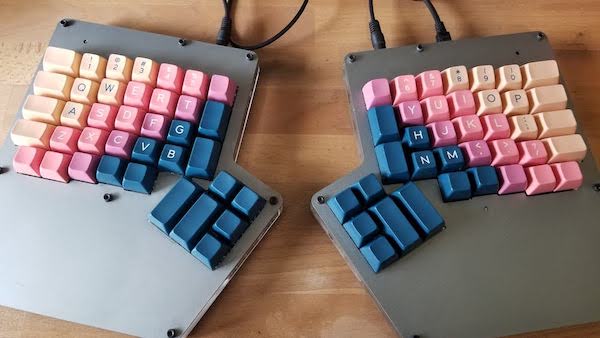
Earlier this year, I wanted to use a landscape photo as my background on my phone. It wasn’t the photo below but we can use it as an example.

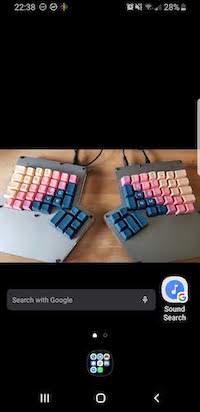
Landscape image of my keyboard

When I made it my background, my phone1 zoomed in to make it fit the portrait orientation of the phone.

Screenshot of phone with zoomed in keyboard photo

This is not great. I don’t want a zoomed in version that fits my vertical phone. I want to see the whole photo with black bars at the top and bottom

I tried to find a way to add these bars using my phone. I couldn’t find an easy way.

At this point, a reasonable solution would have been transferring the photo to a computer, editing it, and transferring it back to my phone. I didn’t do that. Instead, I wrote a little TypeScript2 web app that adds the bars for you. You open the website on your phone, select an image, and then download a properly sized image.

Screenshot of phone with properly fitting image

The tool uses the canvas API and does all of the work in the browser itself. It was a fun, bite-sized project and it gave me an excuse to write some TypeScript and do some web programming. This was the first time I’ve written TypeScript since learning it and I haven’t done any web programming in a while.

Making Photo Fit was not a fast approach to changing my phone’s background. But, now the tool exists and anyone, including future me, can quickly resize their photo from the comfort of their own phone.

Photo Fit is live and available for others to use. I’ve only tested it on my own phone and desktop browsers. It might not work! If you do try it and something weird happens, plese let me know.


  1. A Samsung S8 running Android 9
  2. I recently learned some TypeScript through Execute Program. Execute program is a really neat application of spaced repetition for learning programming concepts.

Using Bazel to help fix flaky tests

Flaky tests are terrible. These are tests that pass or fail without anything changing in the code. They often pass the majority of the time and fail rarely. This makes them hard to detect and cause developers to often just run the tests again.

Flaky tests erode your team’s confidence in your system. They cause folks to get in the habit of not trusting the output of tests. This discourages people from writing tests as they stop seeing them as something that improves quality and instead view them as a drag on productivity.

Flaky tests are often hard to fix. If they were easy to fix, they wouldn’t have been flaky in the first place. One difficulty in fixing them is that the failures are often hard to reproduce.

Often, the first step in fixing a flaky test is to write a script to run the tests multiple times in a row. If you are using Bazel as your build tool you don’t need to write this.

Here is an example bazel1 command for helping you recreate flaky test failures.

bazel test --test_strategy=exclusive --test_output=errors --runs_per_test=50 -t- //...

The above command is running all the test targets in a workspace and each flag is important.

  • --runs_per_test=50 is telling Bazel to run each test 50 times.
  • --test_output=errors is telling Bazel to only print errors to your console.
  • -t- is a shortcut for --nocache_test_results (or --cache_test_results=no). This flag tells Bazel to not cache the test results.
  • --test_strategy=exclusive will cause tests to be run serially. Without this, Bazel could run your test targets concurrently and if your tests aren’t designed for this you may run into other failures.

Flaky tests are terrible and you should try not to have them. Try your best to have reliable tests.


  1. I’ve written this while using Bazel 3.2.0. If you are reading this far in the future the flags may have changed.

How to be automatically notified when long running processes finish

Let me set the stage. I kick off the compilation of a large Scala codebase. This will take minutes to finish, so I switch to Slack and catch up on what coworkers have posted. Someone posted an interesting link and I follow it to an article. Fifteen minutes later, I notice the compilation finished twelve minutes ago. I silently grumble at myself, disappointed that I didn’t start the next step twelve minutes ago.

Has some variation of the above happened to you?

It doesn’t happen to me anymore because now my computer tells me when any long running process finishes. This might sound annoying but it is great. I no longer feel guilty1 for dropping into Slack and can immediately get back to the task at hand as soon the process finishes.

I’ve done this by enhancing on my setup for showing the runtime of the previous command in my prompt. You don’t have to read that article for the rest of this one to make sense, but you should because it shows you how to add a very useful feature to your prompt.

Below is the code that causes my computer to tell me when it finishes running commands that takes longer than 30 seconds. It is found in my ~/.bashrc. An explanation follows the code snippet.

1
2
3
4
5
6
7
8
9
10
11
12
13
14
15
16
17
18
19
20
21
22
23
24
25
26
27
28
29
30
31
32
# Using https://github.com/rcaloras/bash-preexec
preexec() {
  _last_command=$1
  if [ "UNSET" == "${_timer}" ]; then
    _timer=$SECONDS
  else
    _timer=${_timer:-$SECONDS}
  fi
}

_maybe_speak() {
    local elapsed_seconds=$1
    if (( elapsed_seconds > 30 )); then
        local c
        c=$(echo "${_last_command}" | cut -d' ' -f1)
        ( say "finished ${c}" & )
    fi
}

precmd() {
  if [ "UNSET" == "${_timer}" ]; then
     timer_show="0s"
  else
    elapsed_seconds=$((SECONDS - _timer))
    _maybe_speak ${elapsed_seconds}
    timer_show="$(format-duration seconds $elapsed_seconds)"
  fi
  _timer="UNSET"
}

# put at the bottom of my .bashrc
[[ -f "$HOME/.bash-preexec.sh" ]] && source "$HOME/.bash-preexec.sh"

Bash-Preexec triggers the preexec, immediately before a command is execute, and precmd functions, immediately before the shell prompt reappears. Those two functions are enough to figure out how much time has elapsed while a command ran. You setup Bash-Preexec by downloading bash-preexec.sh and sourcing it in your ~/.bashrc.

preexec is passed the command being ran and it captures it in _last_command. It also captures the current number of seconds the shell has been running as _timer.

precmd uses the value in _timer to calculate the elapsed time in seconds and then calls the function _maybe_speak with this as an argument. It also does the work required for showing the elapsed time in my prompt.

If the elapsed time is greater than 30 seconds then _maybe_speak uses cut to discard the arguments of captured command, leaving me with the command itself. It then uses say to produce an audible alert of what command just finished. I discard the arguments because otherwise the say command can go on for a long time.

say is a tool that ships with macOS. I haven’t gotten around to it yet but I’ll need to use something else on my Linux machines.

You may have noticed that I run say in the background and in a subshell. Running it in the background lets me continue interacting with my shell while say finishes executing and running it in a subshell prevents text from appearing in my shell when the background job finishes.

With this setup, I can kick off a slow compile or test run and not feel so bad about dropping into Slack or reading Reddit. It is wonderful and I’d recommend it (though, I’d more strongly recommend not having commands that take a while to run).


  1. I still feel a little guilty as doing so will break any momentum/flow I had going on, but that flow was already broken by the slowness of the command.

How to hang a hangboard using a doorway pull-up bar

If you’ve browsed the adventure section of my website you know I’m a climber. Currently, the climbing gyms in Chicago are closed due to COVID-19 concerns. This has put a damper on my training but I own a hangboard and have been able to keep training my fingers at home.

A hangboard allows you to apply stress to your fingers in a measured and controlled fashion. It is a vital tool for a climber who is serious about getting stronger. It is also a great rehab tool for coming back from injuries.

Below is my hangboard.

Hangboard mounted using hooks and a pull-up bar

As you can see from the photo, I’ve hung mine using a doorway pull-up bar and a bunch of hooks. This lets me easily take it down and causes no permanent damage to anything in my apartment. The towels are there to make sure the door frame isn’t crushed by any of the hard pieces.

Originally, I followed this video to mount it using some pipe and shoving the pipe into the pull-up bar. This setup made me uncomfortable as the forces on the pull-up bar were far away from the intended location. This resulted in a lot of flexing and I was concerned about how the pull-up bar was acting on the frame.

I searched online for other ideas and saw a setup that used hooks. This was appealing to me as it moves your weight under the bar. A quick trip to Home Depot and a bit of easy construction and now I can keep up my finger strength when stuck at home. Here are the steps to build one.

  1. Buy a 2 inch x 10 inch wood board (or some other 2 inch x N inch board that is big enough for whatever you want to attach to it).
  2. Cut the board so it spans the width of your doorway plus a few extra inches. Home Depot can do this for you.
  3. Mount your hangboard to the board.
  4. Take hooks, typically used for hanging bicycles up in a garage, and screw them into the top of your 2-in x 10-in.
  5. Hang the hooks over the pull-up bar. Adjust the hooks so each is pulling on the bar.
  6. Find some padding, I used towels, and put the padding between the door trim and other hard surfaces.
  7. Hang on your hangboard and get stronger.

The board and hook method was much easier to construct than the other pull-up bar method and feels much more solid. The pull-up bar isn’t rated for too much weight, so I’m not going to do any super heavy, two-handed hangs but it is plenty solid for other hangboard exercises.

If you’re a climber and don’t want to permanently mount a handboard, I’d highly recommend this. If you don’t own a hangboard, I pick up something from Tension Climbing. Their wooden boards are easy on the finger tips and have all the edge sizes you’ll need.

Using Bash-Preexec for monitoring the runtime of your last command

My article on putting the runtime of your last command into your bash prompt is one of my most surfaced-by-google articles. Why is this a great to your prompt? To quote my previous article:

I’m fairly certain the following scenario has happened to every terminal user. You run a command and, while it is running, realize you should have prefixed it with time. You momentarily struggle with the thought of killing the command and rerunning it with time. You decide not to and the command finishes without you knowing how long it took. You debate running it again.

For the last year I’ve lived in a world without this problem. Upon completion, a command’s approximate run time is displayed in my prompt. It is awesome.

I’ve been living without the above problem since sometime in 2014 and not having that problem is still awesome.

I have made some changes since 2014.

One change was switching to using Bash-Preexec instead of directly using trap and $PROMPT_COMMAND for calling functions to start and stop tracking runtime. Bash-Preexec lets you trigger a function (or multiple) right after a command has been read and right before each prompt.

The usage is pretty straight forward. In the most basic case, you source bash-preexec.sh and then provide functions named preexec, which is invoked right before a command is executed, and/or precmd, which is invoked just before each prompt. bash-preexec.sh can be downloaded from its repo. The changes required to move to Bash-Preexec pretty pretty minimal.

The other change was introducing the script, format-duration by Gary Fredericks, to humanely format the time. This script converts seconds into a more readable string (example: 310 to 5m10s)

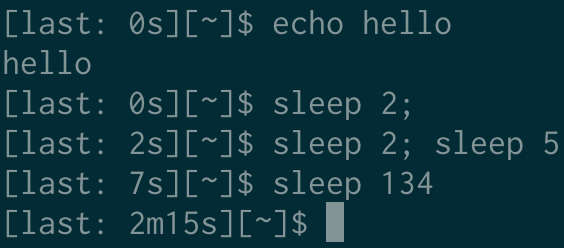
Here is a screenshot of everything in action (with a reduced prompt, my normal one includes git and other info).

Command line prompt showing runtimes of previous commands

Below is a simplified snippet from my .bashrc that provides runtimes using both of these additions.

1
2
3
4
5
6
7
8
9
10
11
12
13
14
15
16
17
18
19
20
21
22
23
24
25
preexec() {
  if [ "UNSET" == "${timer}" ]; then
    timer=$SECONDS
  else
    timer=${timer:-$SECONDS}
  fi
}

precmd() {
  if [ "UNSET" == "${timer}" ]; then
     timer_show="0s"
  else
    the_seconds=$((SECONDS - timer))
    # use format-duration to make time more human readable
    timer_show="$(format-duration seconds $the_seconds)"
  fi
  timer="UNSET"
}

# Add $last_show to the prompt.
PS1='[last: ${timer_show}s][\w]$ '

# a bunch more lines until the end of my .bashrc
# where I include .bash-preexec.sh
[[ -f "$HOME/.bash-preexec.sh" ]] && source "$HOME/.bash-preexec.sh"

No more wondering about the runtime of commands is great. Introducing format-duration made reading the time easier while Bash-Preexec made reading the implementation easier. I highly recommend setting up something similar for your shell.

A retrospective format for remote or co-located teams

See all of my remote/working-from-home articles here.

Retrospectives are a useful type of meeting to have periodically with your team. There are many different formats of retrospectives.

One of them can be summarized in the following steps:

  1. Gather the team together
  2. Set the stage
  3. Brainstorm answers to the questions What went well? and What needs improvement?
  4. Discuss the answers

Let’s talk about each step and see how each works with an co-located or remote team.

Step 1: Gather the team

This step is self explanatory. If you are an in-person team, then this is gathering everyone together in a room for some allotted about of time. If you are a remote team, or have remote folks on your team, then this is gathering everyone together in a video conference.

Preferably everyone in the retro is communicating in same way. This means if anyone is remote, it is preferable that everyone join the video conference from their own computer instead of using a single screen and video from a shared conference room. My earlier article about tips for remote meetings goes into more details on this topic.

Everyone using the same communication method puts everyone on the same page and dramatically improves the experience for the remote folks. With a mixed group, we’ll want to use some remote collaboration tools anyway, so it is useful for everyone to have their own computer with them. They might as well use it for video communication as well.

Step 2: Set the stage

This part doesn’t differ between an entirely in-person meeting, mixed, or entirely remote meeting.

Take the time to set the stage for the meeting. Remind everyone that we’re here to improve and to listen with an open mind. Remind everyone to try to not make things personal and not take things personally. This is a good time to read the Prime Directive.

This is also a good time to set the boundaries of the discussion. What is the retrospective covering? Is it covering the last few weeks? The last quarter? The new working from home experience? Pick a topic so everyone in the meeting focuses on the same things.

Step 3: Answer the questions

In this step, we will answer the questions What went well? and What needs improvement? and use those answers for discussion in the remainder of the meeting. Timebox this step to 5 to 10 minutes.

In an in-person setting, this is often done through the use of Post-it notes. Give each attendee a marker and a stack of notes and have each person write down as many answers as they can come up with, one per post-it note, to the two questions. Dedicate a section of a whiteboard or wall for each question and have people bring the generated answers to the respective sections. Try to group the answers by topics.

With a remote meeting, you don’t have the physical whiteboard and cards. That is perfectly fine! Once you figure out your remote collaboration tools, this part of the retrospective isn’t difficult.

I’ve mostly done remote retrospectives using Trello. Trello works great for this as it is multi-user and does a great job of presenting lists to a group. Here is how previous teams I’ve worked with setup Trello for remote retrospectives.

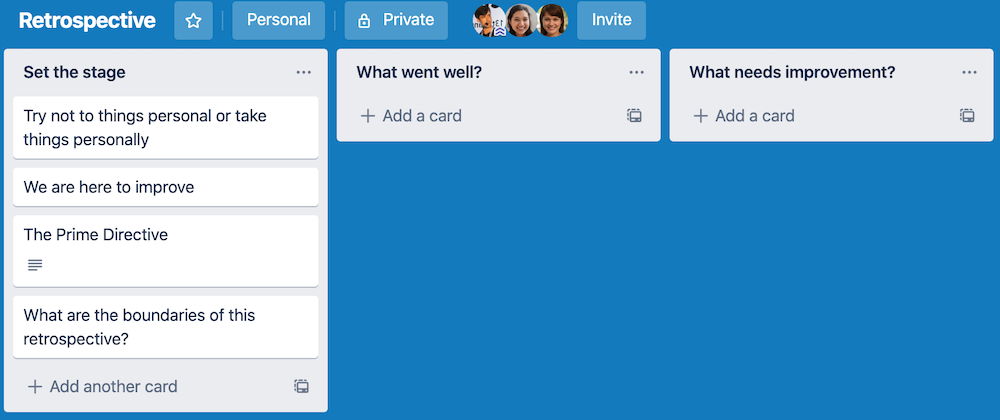
First, make a Trello board and make sure everyone has an invite to view and edit the board. Second, add the following columns to the board.

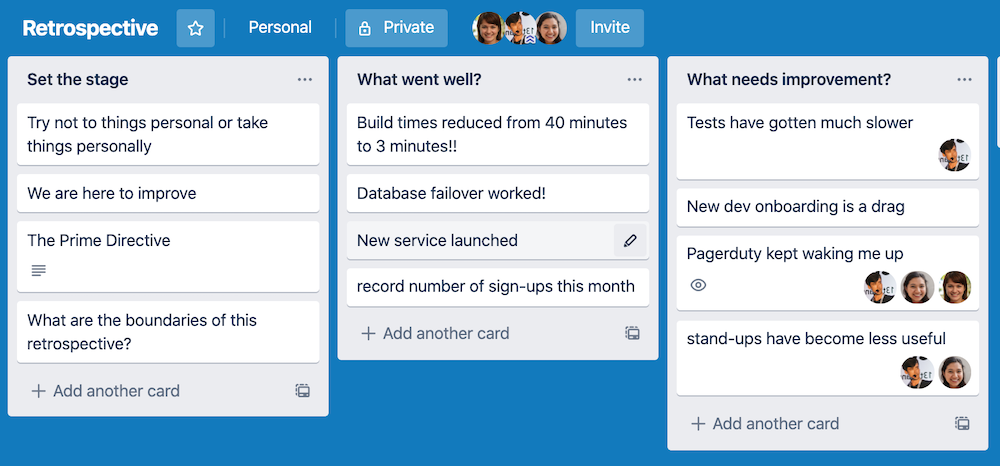
First three columns before any cards

The first column is for Step 2 of the process and is there to remind everyone why we’re all spending time in this meeting.

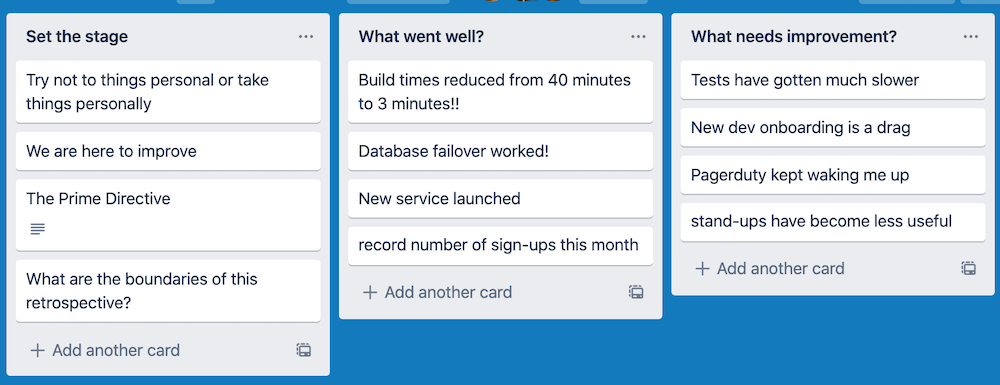
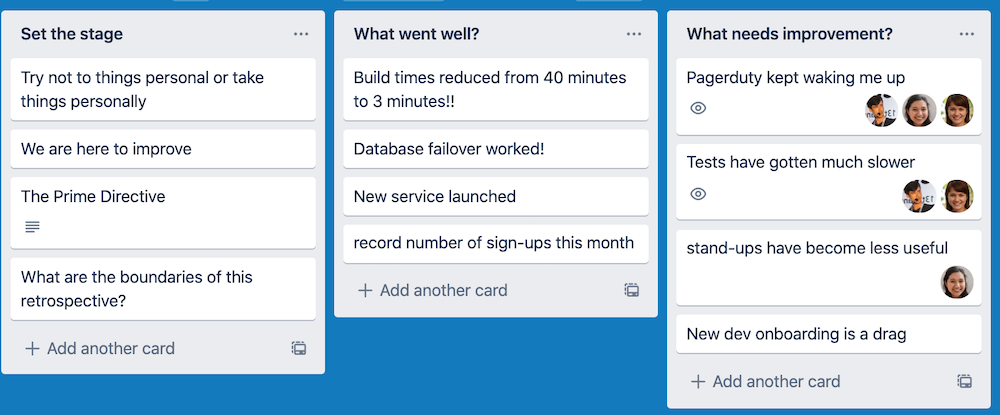
Columns two and three are used in this step. Have attendees add cards to these columns as they come up with answers If anyone notices duplicates during this time frame, move them near each other by dragging them up or down in the column. If you notice someone else has already put a card that you’d put up there, don’t bother putting it down again (this differs from the in-person meeting).

First three columns with cards before voting

[remote only] Step 3.5: Vote on cards

This step sneaks into the remote retrospective and is missing from the in-person retro. In the in-person retro, duplication of post-it notes serves as this voting stage.

Once all the answers have been generated, or time is up, it is time to vote on what will be discussed in the next step. Only have people vote on the What needs improvement? answers.

There are at least two ways of doing this in Trello but my favorite is having attendees hover their mouse cursor over the card and then hit space bar1. This sticks their avatar on the card (in Trello speak, I believe this is called joining a card). You can either restrict folks to a certain number of votes, say 3, or let them go wild and vote as many times as they want. I haven’t found the outcomes to be much different and find infinite votes more fun.

First three columns with votes

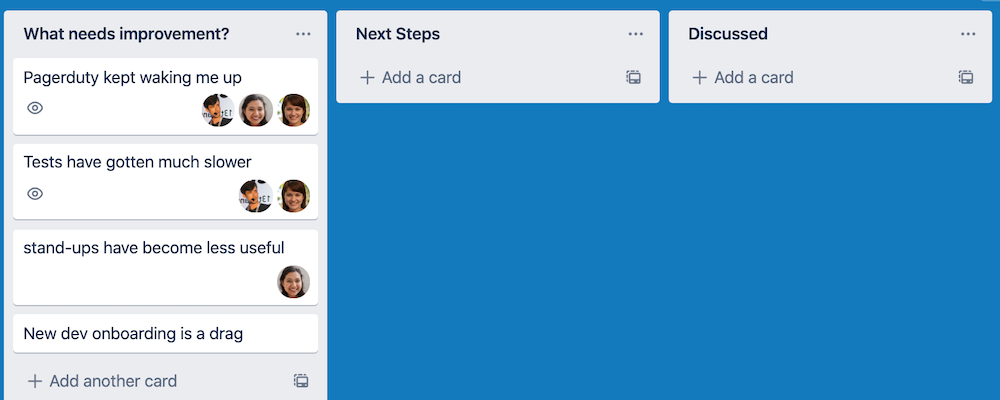
Once voting is finished (again, timer or when it seems to have reached an end), have one person sort the cards by number of votes with the highest votes at the top of the list.

First three columns with cards sorted by votes

Step 4: Discuss the answers

With in-person or remote retros, go over the answers to What went well? first. This starts the discussion with positive feelings. This part usually goes pretty fast as we’re just celebrating wins and not having a long discussions about them.

Next, start discussing the answers to What needs improvement?

For each topic being discussed, set a five minute timer. At the end of the five minutes, do a quick poll of the attendees on if the topic should be continued or not. If it should be continued, start a three minute timer and continue discussion. At the end of those three minutes, repeat the vote for continuing or not.

Throughout the discussion, try to be mindful of people dominating conversation and give everyone a chance to voice their thoughts. Try to figure out some next steps to take to actually start making improvements on what needs to be improved.

The above is generic advice for remote or in-person retros. When you’re running a remote retro using Trello, it can be useful to do the following as well.

You should add two more columns, Next Steps and Discussed, to the right of the What needs improvement? column.

Additional columns added to board

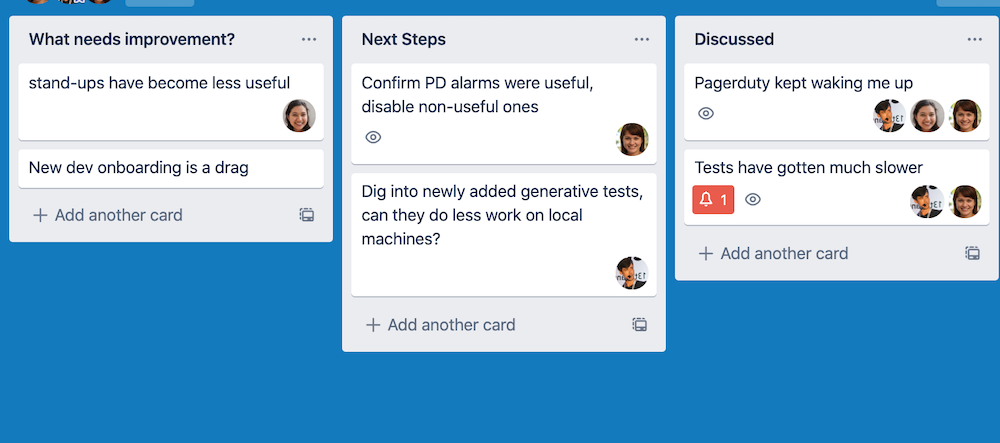
Since your cards are sorted in the What needs improvement? column, you’ll always be talking about the top card. As discussion finishes, move it from the top of the What needs improvement? column into the Discussed column. As Next Steps are discovered, add cards to the Next Steps column and assign the people responsible for following up to the card. Below is an example of those three columns after discussing two cards.

Final state of last three columns

When voting on continuing discussion or not, it can be useful to have a hand signal for taking the vote and for continuing or ending the discussion. We’d do a quick thumbs up or thumbs down and if half the team wants to keep going then we’d seamlessly start the next timer.

Conclusion

Retrospectives can be a very handy tool for a team’s continuous improvement. If time isn’t provided for reflecting, then reflecting does not happen and this makes improving harder.

Remote retrospectives provide a challenge since most of us only have experience using physical sticky notes or whiteboards for collecting answers. We don’t need to recreate the same form factor for remote retrospectives. Using remote collaboration tools, such as Trello, that don’t recreate the sticky-note-on-wall experience can lead to initial confusion but, once familiar with them, the experience is pleasant and allows for greater participation.

How is participation increased? Well, in an in-person retrospective you often are unable to read what everyone else has stuck up on the wall because of physical distance. With a remote retro, you’re able to read every answer added to the lists.

Don’t be afraid of running a remote retrospective. They can be incredibly useful.


  1. The alternative method I’m aware of is to use a Trello Power-up to enable voting on cards. But why bother doing this when you can just stick faces on cards.

More working from home tips

See all of my remote/working-from-home articles here.

With the the new coronavirus spreading through the world, more people are either choosing or are being forced to work from home. From 2013 to 2018, the companies I worked for were entirely remote. For the rest of my professional career, 2007 to 2013 and 2018 to now (March 2020), I’ve also frequently worked from home.

I’ve managed to be very effective at it and I think others can be as well.

After years of working in an office, transitioning to working from home isn’t easy. I had difficulty with the transition and people I’ve mentored have as well. I think most people will be able to be effective at home, assuming their workplace is supportive, if they try to get better at it. With a supportive company or team, once you get used to working from home you probably find yourself getting more done.

The key word in the sentence “I’m working from home” is working. You are going to be working where you spend a lot of your non-work time. This can be a difficult mental transition. Physically switching to an office environment can help switch your brain into work mode and now you no longer have that. Don’t worry, it might feel rough in the beginning but you will get better at it.

I’ve written more articles about working remotely and I’d recommend you read those as well. This article is primarily targeted at the person not making a permanent change in their work from home status. My Guide to Distributed Work is a bit more targeted at someone that is permanently choosing to work at home or in a position of power to influence work from home policies at a company. I’d recommend that you read it as well as many of the subjects it talks about are generally applicable. It steps through some of the pros and cons of remote work and links to other writing on the topic.

Below is a hodgepodge of tips for working from home.

Setup a home workspace

In my years of remote work, I’ve always managed to have a dedicated space for work. In some apartments, this was a corner of a room where I put a desk and faced a wall. In other apartments, I’ve been privileged enough to have a dedicated room for an office.

If you aren’t planning on working from home permanently, or very frequently, then you probably don’t want to spend a significant amount of money setting up a work area. This probably means you don’t want to find a home with a dedicated office and you may not want or be able to dedicate a portion of a room to a desk1.

Whatever your living arrangement is, I’d encourage you to figure a way to have a regular spot to work at while you are working. Having a regular spot to work from will help your brain turn on and off from work mode.

Setting up a home workspace can be as low cost as using a tv tray or folding table2 with a chair. Your setup could be as elaborate as getting a height adjustable desk with large monitors. It could be something else entirely.

Find something that works for you and stick with it.

Beyond a dedicated space to work, make sure you have a reliable internet connection. If you can, use Ethernet as it is generally better than WiFi. I’ve never had a situation where I could use Ethernet and have found that having a good router is enough to make my WiFi reliable.

Discuss boundaries and expectations with your cohabitants

If you live with others that will be at home while you need to work, you should have a discussion with them about boundaries. You are at home to do work and that expectation needs to be set. You may be able to do some household chores during breaks or take other breaks with cohabitants but everyone in your living area needs to understand you are at home to work.

If you have children that might have a particularly hard time with this, it can be useful to use some sort of physical signaling device (examples: a closed door, a light bulb being on, a closed curtain, headphones on) that you should not be interrupted.

Minimize distractions

This one is obvious but try to minimize distractions. Don’t try to sit on your couch with the TV on and do work. You won’t be doing great work.

If your home is loud and you have difficulty in a loud space, wear some ear plugs or noise canceling headphones.

If cohabitants are distractions, refer to the above section and have that discussion with them about needing space. One technique for dealing with interrupting cohabitants is to schedule time throughout your day for them. You can use these scheduled times as breaks through out your working day.

If you try to get some household chores done while working at home, make sure you schedule time for doing them. This could be putting the time on your calendar or simply setting a timer when taking a break. Regardless of the method, when your time is up, get back to work.

I’ve often found that finishing a short, simple household task can actually jump-start finishing more complicated work tasks. Using that momentum from the household chore can make accomplishing work tasks easier.

Having difficulty starting a work task?

Sometimes it is hard to start a task. It can be especially hard if you are new to working at home and not used to working in your environment.

One technique I’ve found useful is the Pomodoro technique. The steps to this technique are below.

  1. Pick a task.
  2. Set and start a timer (usually for 25 minutes).
  3. Focus intensely on the task for the duration of the timer.
  4. Make a mark on a piece of paper
  5. If you have fewer than four marks on the paper, take a 5 minute break and then go back to step 2.
  6. If you have four marks on the paper, then take a 15 minute break and go back to step 1.

I don’t follow those steps strictly and mostly use the trick of setting a timer for focused work. If at the end of the timer I feel like continuing, I’ll reset the timer. If I need a break, I’ll set the timer for a short period of time and take a break.

It was mentioned above, but sometimes doing a small, easy task can jump-start knocking out TODOs. This small, easy task could be something work related or some simple chore around the house.

Be mindful of your communication

Text communication is hard. It is often taken more negative than intended. Be mindful of that.

Try to take what your coworkers write in the most positive way possible.

Try to be careful with your own written communication. It sounds ridiculous but emojis can help make you look like less of a jerk and set a friendly tone.

Don’t hesitate to jump on a video or voice call with someone (or a group). Video is a much higher quality interaction than voice and both are much higher quality than text. The downside is the communication isn’t persistent so be sure to write down outcomes of conversations.

Sync up with your team

Try to sync up with your team (if you don’t have a team, sync up with someone else from the company) at a regular interval. This should probably be at least once every couple days but it can be more regularly. I usually once a day.

It can be easy to feel like an island when you are part of a remote group. Regular sync-ups help reduce that feeling.

Collaborate remotely

Most video conference software allows you to share your screen with others. Some of them even allow others to take control of your machine or treat your screen as a whiteboard.

Take advantage of these features. After learning how to use them, these features can often make remote collaboration as productive as in-person collaboration.

Using technology, you can even pair program with someone from another city.

Google Docs is another great remote collaboration tool. The best meetings I have been part of were meetings where every attendee was editing a shared Google Doc.

Video Meetings

When possible, have video meetings over voice only conference calls. The addition of body language through video makes remote conversations much better.

You might want to introduce hand gestures for signaling during video meetings3. On a former team, we had the practice of raising a finger4 when you wanted to speak. This practice helped prevent people from interrupting and speaking over each other. It also let quieter people jump into conversations easier.

As far as I can tell, Zoom is still the winner in terms of video conferencing.

I also recommend using a headset with dedicated microphone for talking through your computer. The sound quality is usually better than using the built-in microphone.

End

It can be difficult to get good at working from home. It is definitely a skill that is learned through experience and reflection. If you have any questions about working remotely, feel free to reach out on twitter or through email.

Working from home can be a great experience.


  1. A desk can be any table that you can work on that is comfortable for a reasonable amount of time. It doesn’t have to be what someone would typically think of as a desk.
  2. I used a table like this for years in college and when working an internship.
  3. These are also useful for in-person meetings.
  4. No, not the middle finger.