Jake McCrary

My favorite clj-refactor features

If you write Clojure using Emacs you should check out clj-refactor. It is working better than ever and makes developing Clojure more enjoyable.

I don’t use all the features in clj-refactor. There are a lot of features I haven’t had the need to use and many I just can’t remember. Below are the features I use consistently.

Favorite Features

My favorite feature of clj-refactor is the magic requires. This feature lets you type a prefix (such as (str/)) and have the namespace automatically added to your ns form (in this example [clojure.string :as str]). It is awesome. You can also add your own prefix mappings.

My other most frequently used refactorings are introduce let, expand let, and move to let. These three are very complementary and are a quick way if introducing named locals.

Add missing libspec is a recent discovery of mine. Have you ever paired with a developer who uses Intellij with Cursive and been a bit jealous of the auto-requiring? I have. This refactoring lets you do that. Type whatever symbol you want and clj-refactor tries to resolve it and then require the containing namespace with correct prefix. Recently I broke a massive namespace into a few smaller ones and this refactoring saved me a ton of time.

I used to use move form when trying to reorganize namespaces but now I pretty much just cut and paste and use add missing libspec to fix the requires. I want to use move form but I haven’t had a ton of success with it. Add missing libspec plus cut and paste is a few more steps but my success rate has been much higher.

Sort ns does exactly what it says, it sorts your ns form. Once you get used to keeping your ns forms sorted you won’t go back.

Extract function is another refactoring I recently stumbled upon. I’ve used it a few times since then and when it works it is pretty awesome. I’ve had unexpected behavior a couple of times but it was unclear if that was my fault or it not handling macros well. If you’re extracting a function you might as well give it a shot.

The final feature is the automatic insertion of namespace declarations when you create a new Clojure file. I nearly forgot to highlight this feature because it requires no action on my side and it is amazing. If I never have to type a namespace symbol again I’ll be happy.

Customization

Below is my entire clj-refactor setup from my Emacs init.el. It doesn’t take much to get it to a state I like.

1
2
3
4
5
6
7
8
9
10
11
12
13
14
15
16
17
(require 'clj-refactor)

;; Add custom magic requires.
(dolist (mapping '(("maps" . "outpace.util.maps")
                   ("seqs" . "outpace.util.seqs")
                   ("times" . "outpace.util.times")
                   ("repl" . "outpace.util.repl")
                   ("time" . "clj-time.core")
                   ("string" . "clojure.string")))
  (add-to-list 'cljr-magic-require-namespaces mapping t))

(setq cljr-favor-prefix-notation nil)

(add-hook 'clojure-mode-hook (lambda ()
                               (clj-refactor-mode 1)
                               (yas/minor-mode 1)
                               (cljr-add-keybindings-with-prefix "C-c C-x")))

If you use Emacs and write Clojure you should check out clj-refactor. There are enough features that consistently work and help keep you in the flow that it is worth using.

Emacs: automatically require common namespaces

If you’re writing Clojure in Emacs you should check out clj-refactor. It provides some neat functionality. Some examples include the ability to extract functions, introduce let forms, and inline symbols. It also has a feature called “magic requires” that automatically requires common namespaces when you type their short form.

Out of the box five short forms are supported. They are io for clojure.java.io, set for clojure.set, str for clojure.string, walk for clojure.walk, and zip for clojure.zip. If you type (str/ then (:require [clojure.string :as str]) will be added to your ns form. It is pretty awesome. This feature is on by default but you can turn it off by adding (setq cljr-magic-requires nil) to your Emacs configuration.

This feature is also extensible. You can add your own mappings of short form to namespace. The following snippet of elisp adds mappings for maps, seqs, and string.

1
2
3
4
(dolist (mapping '(("maps" . "outpace.util.maps")
                   ("seqs" . "outpace.util.seqs")
                   ("string" . "clojure.string")))
  (add-to-list 'cljr-magic-require-namespaces mapping t))

It doesn’t take a lot of code but having it is awesome. If there are namespaces you frequently require I highly recommend setting this up.

Use git pre-commit hooks to stop unwanted commits

Sometimes you’ll make a change to some code and not want to commit it. You probably add a comment to the code and hope you’ll either see the comment in the diff before committing or just remember not to check in the change. If you’ve ever done this you’ve probably also committed something you didn’t mean to commit. I know I have.

Luckily we can do better. Using git pre-commit hooks we can make git stop us from committing. Below is a git pre-commit hook that searches for the text nocommit and if found rejects the commit. With it you can stick nocommit in a comment next to the change you don’t want committed and know that it won’t be committed.

The code

1
2
3
4
5
6
7
8
9
10
11
12
13
14
15
16
17
18
19
20
21
22
23
24
25
26
27
28
29
30
31
32
33
34
35
36
37
38
39
40
41
42
43
44
45
46
47
48
49
50
51
52
53
54
55
56
57
58
#!/bin/sh

# If you use a GUI for controlling git, you might want to comment out the `tput` commands.
# Some users have had problems with those commands and whatever GUI they are using.

if git rev-parse --verify HEAD >/dev/null 2>&1
then
    against=HEAD
else
    # Initial commit: diff against an empty tree object
    against=$(git hash-object -t tree /dev/null)
fi

patch_filename=$(mktemp -t commit_hook_changes.XXXXXXX)
git diff --exit-code --binary --ignore-submodules --no-color > "$patch_filename"
has_unstaged_changes=$?

if [ $has_unstaged_changes -ne 0 ]; then
    # Unstaged changes have been found
    if [ ! -f "$patch_filename" ]; then
        echo "Failed to create a patch file"
        exit 1
    else
        echo "Stashing unstaged changes in $patch_filename."
        git checkout -- .
    fi
fi

quit() {
    if [ $has_unstaged_changes -ne 0 ]; then
        git apply "$patch_filename"
        if [ $? -ne 0 ]; then
            git checkout -- .
            git apply --whitespace=nowarn --ignore-whitespace "$patch_filename"
        fi
    fi

    exit $1
}


# Redirect output to stderr.
exec 1>&2

files_with_nocommit=$(git diff --cached --name-only --diff-filter=ACM $against | xargs -I{} grep -i "nocommit" -l {} | tr '\n' ' ')

if [ "x${files_with_nocommit}x" != "xx" ]; then
    tput setaf 1
    echo "File being committed with 'nocommit' in it:"
    IFS=$'\n'
    for f in $(git diff --cached --name-only --diff-filter=ACM $against | xargs -I{} grep -i "nocommit" -l {}); do
        echo $f
    done
    tput sgr0
    quit 1
fi

quit 0

Lines 3-10 figure out what revision to diff against. They can pretty much be ignored.

Lines 11-30 are all about handling unstaged changes. They create a patch with these changes and revert these changes from the repository. Then, in the function quit, the unstaged changes are reapplied to the repository. All of this is done so that nocommit in a un-committed piece of text doesn’t cause the committed changes to be rejected.

Some online guides suggest using git stash to achieve what is described above. I started out using git stash but ran into problems where I’d end up in weird states. Unfortunately I didn’t take good notes and I’m unable to describe the various bad things that happened. Trust me when I say bad things did happen and that this way (create patch, revert, apply patch) is much more successful.

Line 36 figures out what files contain nocommit. Lines 38-44 report what files contain nocommit and then rejects the commit by exiting with a non-zero exit code. The first tput changes the output of the echo commands to colored red and the second tput changes output back to default.

Warning: I know many developers that love using this and have had no problems. I get the occasional report of it not working. If it doesn’t work, and it seems like you’ve lost changes, you can find the patch file wherever mktemp creates files on your local machine. I’d still recommend testing it out on a small changeset so if something doesn’t work on your machine you don’t have to both debug why and recreate your changes.

Using with a single repository

To enable in a single repository you need to add the above code to a .git/hooks/pre-commit file in your local repository and make that file executable. Once you’ve done that try adding nocommit to a file and then try to commit it. The commit will be rejected if the pre-commit hook is setup properly.

Using with multiple repositories

I want this pre-commit hook enabled in all of my repositories. I use git init templates to do this. git help init or a Google search can help fill in the gaps with setting this up but below are the steps I ended up taking.

  1. git config --global init.templatedir ~/.git-templates
  2. mkdir -p ~/.git-templates/hooks
  3. touch ~/.git-templates/hooks/pre-commit
  4. Copy and paste the above code into ~/.git-templates/hooks/pre-commit
  5. chmod +x ~/.git-templates/hooks/pre-commit

After following those steps any repository created by git init will contain the pre-commit hook. To add to an existing repository cd into the repo and run git init ..

Example output

If you try to commit some text with nocommit in it you’ll see something similar to the image below and the commit will be rejected.

Error message

If you ever need to commit and want to ignore pre-commit hooks (example: If you are writing a blog post that is full of the text nocommit) then you can ignore pre-commit hooks by using git commit --no-verify.

I’ve found this pre-commit hook really useful. It has saved me from committing numerous times. I’d recommend adopting it.

Errata

2015/12/23

I’m updated the code to be more portable. It was brought to my attention by a comment that the original code took advantage of some bash extensions and specific mktemp behavior found in OS X. The pre-commit code has now been tested works in OS X and Ubuntu 14.04. There may be minor changes you need to perform to get it to work on your system.

2017/04/28

Updated code to handle if mktemp fails and if whitespace changes between creating a patch and applying it. Also adds in a change that better handles whitespace in paths.

Put the last command's run time in your Bash prompt

An updated version of this post can be found here

I’m fairly certain the following scenario has happened to every terminal user. You run a command and, while it is running, realize you should have prefixed it with time. You momentarily struggle with the thought of killing the command and rerunning it with time. You decide not to and the command finishes without you knowing how long it took. You debate running it again.

For the last year I’ve lived in a world without this problem. Upon completion, a command’s approximate run time is displayed in my prompt. It is awesome.

Overview

Most of the code below is from a post on Stack Overflow. It has been slightly modified to support having multiple commands in your $PROMPT_COMMAND variable. Below is a minimal snippet that could be included in your .bashrc.

1
2
3
4
5
6
7
8
9
10
11
12
13
14
15
16
17
18
function timer_start {
  timer=${timer:-$SECONDS}
}

function timer_stop {
  timer_show=$(($SECONDS - $timer))
  unset timer
}

trap 'timer_start' DEBUG

if [ "$PROMPT_COMMAND" == "" ]; then
  PROMPT_COMMAND="timer_stop"
else
  PROMPT_COMMAND="$PROMPT_COMMAND; timer_stop"
fi

PS1='[last: ${timer_show}s][\w]$ '

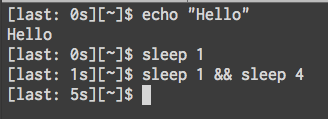
Modify your .bashrc to include the above and you’ll have a prompt that looks like the image below. It is a minimal prompt but it includes the time spent on the last command. This is great. No more wondering how long a command took.

Example of prompt

The details

timer_start is a function that sets timer to be its current value or, if timer is unset, sets it to the value of $SECONDS. $SECONDS is a special variable that contains the number of seconds since the shell was started. timer_start is invoked after every simple command as a result of trap 'timer_start' DEBUG.

timer_stop calculates the difference between $SECONDS and timer and stores it in timer_show. It also unsets timer. Next time timer_start is invoked timer will be set to the current value of $SECONDS. Because timer_stop is part of the $PROMPT_COMMAND it is executed prior to the prompt being printed.

It is the interaction between timer_start and timer_stop that captures the run time of commands. It is important that timer_stop is the last command in the $PROMPT_COMMAND. If there are other commands after it then those will be executed and their execution might cause timer_start to be called. This results in you timing the length of time between the prior and current prompts being printed.

My prompt

My prompt is a bit more complicated. It shows the last exit code, last run time, time of day, directory, and git information. The run time of the last command is one of the more useful parts of my prompt. I highly recommend you add it to yours.

My prompt

Errata

2015/5/04

Gary Fredericks noticed that the original code sample broke if you didn’t already have something set as your $PROMPT_COMMAND. I’ve updated the original snippet to reflect his changes.

Quieter clojure.test output

If you use clojure.test then there is a good chance you’ve been annoyed by all the output when you run your tests in the terminal. When there is a test failure you have to scroll through pages of output to find the error.

With release 0.9.0 of lein-test-refresh you can minimize the output of clojure.test and only see failure and summary messages. To enable this feature add :quiet true to the :test-refresh configuration map in either your project.clj or profiles.clj file. If you configure lein-test-refresh in ~/.lein/profiles.clj then turning on this feature looks like the following. 1

1
2
{:user {:plugins [[com.jakemccrary/lein-test-refresh "0.9.0"]]
        :test-refresh {:quiet true}}}

Setting up your profiles.clj like above allows you to move to Clojure project in your terminal, run lein test-refresh, and have your clojure.tests run whenever a file changes. In addition, your terminal won’t show the usual Testing a.namespace output.

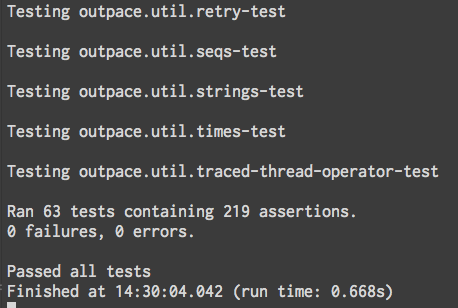
Below is what you typically see when running clojure.test tests in a terminal. I had to cut most of the Testing a.namespace messages from the picture.

Normal view of test output

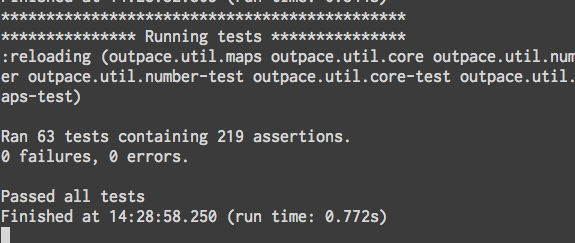
The following picture is with quiet mode turned on in lein-test-refresh. No more Testing a.namespace messages! No more scrolling through all your namespaces to find the failure!

Minimal output in console

I just released this feature so i haven’t had a chance to use it too much. I imagine it may evolve to change the output more.


  1. More configuration options can be found here

Making tmate and tmux play nice with OS X terminal-notifier

For nearly the last two years, I’ve been doing most of my development in OS X. Most of that development has been done in Clojure and, whenever possible, using lein-test-refresh with terminal-notifier to have my tests automatically run and a notification shown with the status of the test run. Its a great work flow that gives me a quick feedback cycle and doesn’t pull my attention in different directions.

Recently I’ve started using tmate for remote pairing. Unfortunately when I first started using it my quick feedback cycle was broken. lein test-refresh would run my tests but would become hung when sending a notification using terminal-notifier. This was terrible and, if I hadn’t been able to fix it, would have stopped me from using tmate. After some searching I stumbled across this GitHub issue which helped solve the problem.

To make tmate work nicely with terminal-notifier you’ll need to install reattach-to-user-namespace and change your tmate configuration to use it. If you use brew you can install by running brew install --with-wrap-pbcopy-and-pbpaste reattach-to-user-namespace. Then open your .tmux.conf or .tmate.conf file and add the line below.

1
set-option -g default-command "which reattach-to-user-namespace > /dev/null && reattach-to-user-namespace -l $SHELL || $SHELL"

The above tells tmate to use reattach-to-user-namespace if it is available. Now terminal-notifier no longer hangs when invoked inside tmate. Unsurprisingly, this change also makes tmux place nice with terminal-notifier.

My home work space

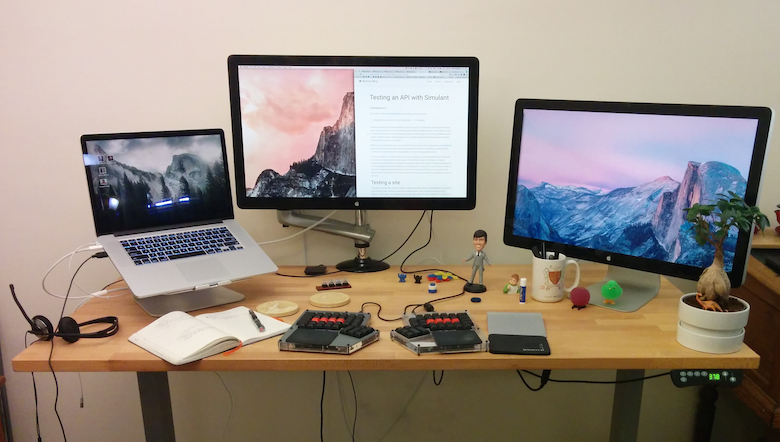
I’ve been working remotely for about a year and a half. In that time, I’ve worked from many locations but most of my time has been spent working from my apartment in Chicago. During this time I’ve tweaked my environment by building a standing desk, building a keyboard, and changed my monitor stands. Below is a my desk (click for larger image).

My Desk

The Desk

I built my own desk using the Gerton table top from Ikea and the S2S Height Adjustable Desk Base from Ergoprise. I originally received a defective part from Ergoprise and after a couple emails I was sent a replacement part. Once I had working parts, attaching the legs to the table top was straightforward. The desk legs let me adjust the height of my desk so I can be sitting or standing comfortably.

The Monitors

I have two 27 inch Apple Cinema displays that are usually connected to a 15 inch MacBook Pro. The picture doesn’t show it, but I actively use all the monitors.

My laptop is raised by a mStand Laptop Stand. While I’m sitting this stand puts the laptop at a comfortable height. I highly recommend getting one.

The middle monitor, the one I use the most, has had the standard stand (you can see it in the right monitor) replaced with an ErgoTech Freedom Arm. This lets me raise the monitor to a comfortable height when I’m standing (as seen in this picture). It also allows me to rotate the monitor vertically, though I have only done that once since installing it. Installation of the arm wasn’t trivial, but it wasn’t that difficult.

I’ve been using the arm for four months now and I’m enjoying it. If you bump the desk the monitor does wobble a bit but I don’t notice it while I’m typing. I haven’t noticed any slippage; the monitor arm seems to hold the monitor in place.

I’ve decided against getting a second arm for my other monitor. Installing the monitor arm renders your monitor non-portable. It doesn’t happen often, but sometimes I travel and stay at a place for long enough that I want to bring a large monitor.

The Chair

My desk chair is a Herman Miller Setu. It is a very comfortable chair that boasts only a single adjustment. You can only raise or lower it.

I moved to this chair from a Herman Miller Aeron. The Aeron had been my primary chair for eight years prior to me buying the Setu.

They are both great chairs. I haven’t missed the extreme amount of customization the Aeron provides; its actually nice having fewer knobs to tweak. I also find the Setu more visually appealing. The Aeron is sort of a giant black monster of a chair; I prefer seeing the chartreuse Setu in my apartment.

The Keyboard and Mouse

I built my own keyboard. It is an ErgoDox with Cherry MX Blue key switches and DSA key caps. More details about my build can be found in an earlier post.

I’ve been using this keyboard for about eight months. It has been rock solid. This is my first keyboard that has mechanical switches. They are nice. It feels great typing on this keyboard.

The ErgoDox has six keys for each thumb. I originally thought I’d be using the thumb clusters a lot but, in practice, I only actively use two or three keys per thumb.

The ErgoDox also supports having multiple layers. This means that with the press of a key I can have an entirely different keyboard beneath my finger tips. It turns out this is another feature I don’t frequently use. I really only use layers for controlling my music playback through media keys and for hitting function keys.

If I were going to build a keyboard again I would not use Cherry MX Blues as the key switch. They are very satisfying to use but they are loud. You can hear me type in every room of my one bedroom apartment. When I’m remote pairing with other developers, they can here me type through my microphone.

For my mouse I use Apple’s Magic Trackpad. I definitely have problems doing precise mouse work (though I rarely find myself needing this) but I really enjoy the gestures in enables. I’ve been using one of these trackpads for years now. I really don’t want to go back to using a mouse.

Other Items

I’m a fan of using pens and paper to keep track of notes. My tools of choice are Leuchturm Whitelines notebook with dotted paper and a TWSBI 580 fountain pen with a fine nib. I’ve been using fountain pens1 for a couple years now and find them much more enjoyable to use than other pen styles. The way you glide across the page is amazing. I usually have my pen inked with Noodler’s 54th Massachusetts. The ink is a beautiful blue black color and very permanent.

No desk is complete without a few fun desk toys. My set of toys includes a bobble head of myself (this was a gift from a good friend), a 3d printed Success Kid, a keyboard switch sampler, a few more 3d printed objects, and some climbing related hand toys.

End

That pretty much covers my physical work space. I’ve tweaked it enough where I don’t feel like I need to experiment anymore. The monitor arm is my most recent addition and it really helped bring my environment to the next level. I think I’ll have a hard time improving my physical setup.


  1. If you want to try out fountain pens I highly recommend the Pilot Metropolitan. It is widely regarded as the best introduction to fountain pens. The medium nib is about the same width as my fine. It is a great introduction to fountain pens. Another great intro pen (that includes a smiling face on the nib) is the Pilot Kakuno.

Advanced Leiningen checkouts: configuring what ends up on your classpath

Leiningen checkout dependencies are a useful feature. Checkout dependencies allow you to work on a library and consuming project at the same time. By setting up checkout dependencies you can skip running lein install in the library project; it appears on the classpath of the consuming project. An example of what this looks like can be found in the Leiningen documentation or in a previous post of mine.

By default, Leiningen adds the :source-paths, :test-paths, :resource-paths, and :compile-path directories of the checkout projects to your consuming project’s classpath. It also recurses and adds the checkouts of your checkouts (and keeps recursing).

You can override what gets added to your classpath by :checkout-deps-shares to your project.clj. This key’s value should be a vector of functions that when applied to your checkouts' project map return the paths that should be included on the classpath. The default values can be found here and an example of overriding the default behavior can be found in the sample.project.clj.

I ran into a situation this week where having my checkouts' :test-paths on the classpath caused issues my consuming project. My first pass at fixing this problem was to add :checkout-deps-shares [:source-paths :resource-paths :compile-path] to my project.clj. This didn’t work. My project.clj looked like below.

1
2
3
4
(defproject example "1.2.3-SNAPSHOT"
  :dependencies [[library "1.2.2"]
                 [org.clojure/clojure "1.6.0"]]
  :checkout-deps-shares [:source-paths :resource-paths :compile-path])

Why didn’t it work? It didn’t work because of how Leiningen merges duplicate keys in the project map. When Leiningen merges the various configuration maps (from merging profiles, merging defaults, etc) and it encounters values that are collections it combines them (more details found in documentation). Using lein pprint :checkout-deps-shares shows what we end up with.

1
2
3
4
5
6
7
8
9
10
$ lein pprint :checkout-deps-shares
(:source-paths
 :resource-paths
 :compile-path
 :source-paths
 :test-paths
 :resource-paths
 :compile-path
 #<Var@43e3a075:
   #<classpath$checkout_deps_paths leiningen.core.classpath$checkout_deps_paths@6761b44b>>)

We’ve ended up with the default values and the values we specified in the project.clj. This isn’t hard to fix. To tell Leiningen to replace the value instead of merging you add the ^:replace metadata to the value. Below is the same project.clj but with ^:replace added.

1
2
3
4
(defproject example "1.2.3-SNAPSHOT"
  :dependencies [[library "1.2.2"]
                 [org.clojure/clojure "1.6.0"]]
  :checkout-deps-shares ^:replace [:source-paths :resource-paths :compile-path])

This solves the problem of :test-paths showing up on the classpath but it introduces another problem. Checkouts' checkout dependencies no longer show up on the classpath. This is because leiningen.core.classpath/checkout-deps-paths is no longer applied to the checkouts.

Without leiningen.core.classpath/checkout-deps-paths Leiningen stops recursing and, as a result, no longer picks up checkouts' checkout dependencies. My first attempt at fixing this was to modify my project.clj so the :checkout-deps-shares section looked like below.

1
2
:checkout-deps-shares ^:replace [:source-paths :resource-paths :compile-path
                                 leiningen.core.classpath/checkout-deps-paths]

The above fails. It runs but doesn’t actually add the correct directories to the classpath. The next attempt is below.

1
2
:checkout-deps-shares ^:replace [:source-paths :resource-paths :compile-path
                                 #'leiningen.core.classpath/checkout-deps-paths]

This attempt failed quicker. Now an exception is thrown when trying to run Leiningen tasks.

The next one works. It takes advantage of dynamic eval through read-eval syntax. With the below snippet the checkouts' checkouts are added to the classpath.

1
2
:checkout-deps-shares ^:replace [:source-paths :resource-paths :compile-path
                                 #=(eval leiningen.core.classpath/checkout-deps-paths)]

Hopefully this is useful to someone else. It took a bit of digging to figure it out and many incorrect attempts to get correct. The full example project.clj is below.

1
2
3
4
5
(defproject example "1.2.3-SNAPSHOT"
  :dependencies [[library "1.2.2"]
                 [org.clojure/clojure "1.6.0"]]
  :checkout-deps-shares ^:replace [:source-paths :resource-paths :compile-path
                                   #=(eval leiningen.core.classpath/checkout-deps-paths)])

Remote Pairing

See all of my remote/working-from-home articles here.

Over a year ago I joined Outpace. All of Outpace’s developers are remote but we still practice pair programming. As a result I’ve done a lot of remote pairing. I was skeptical before joining that it would work well and I’m happy to report that I was wrong. Remote pairing works.

Why remote pairing?

The usual pair programming benefits apply to remote pairing; more people know the code, quality is higher, and it provides an opportunity for mentorship. Another benefit, more beneficial in a remote setting, is that it increases social interaction.

The most common response I receive when I tell someone I work from my apartment is “I’d miss the interaction with co-workers.” When you work remote you do miss out on the usual in office interaction. Pair programming helps replace some of this. It helps you build and maintain relationships with your remote colleagues.

Communication

Communication is an important part of pair programming. When you’re pairing in person you use both physical and vocal communication. When remote pairing you primarily use vocal communication. You can pick up on some physical cues with video chat but it is hard. You will never notice your pair reaching for their keyboard.

I’ve used Google Hangouts, Zoom, and Skype for communication. Currently I’m primarily using Zoom. It offers high quality video and audio and usually doesn’t consume too many resources.

I recommend not using your computers built-in microphone. You should use headphones with a mic or a directional microphone. You’ll sound better and you’ll stop your pair from hearing themselves through your computer.

I use these headphones. They are cheap, light, and open-eared but are wired. I’ve been told I sound the best when I’m using them. I also own these wireless headphones. They are closed-ear, heavier, and wireless. The wireless is great but the closed-ear design causes me to talk differently and by the end of the day my throat is hoarse. Both of these headphones are widely used by my colleagues and I don’t think you can go wrong with either one.

Some people don’t like wearing headphones all day. If you are one of those I’d recommend picking up a directional microphone. Many of my colleagues use a Snowball.

Connecting the machines

So now you can communicate with your pair. It is time to deal with the main problem in remote pairing. How do you actually work on the same code with someone across the world?

At Outpace we’ve somewhat cheated and have standardized our development hardware. Everyone has a computer running OS X and, if they want it, at least one 27 inch monitor (mostly Apple 27 inch displays or a Dell) with a resolution of 2560x1440. Since everyone has nearly identical hardware and software we are able to pair using OS X’s built-in screen sharing. This allows full sharing of the host’s desktop. This full desktop sharing is the best way to emulate working physically next to your pair. This enable the use of any editor and lets you both look at the same browser windows (useful for testing UIs or reading reference material). With decent internet connections both programmers can write code with minimal lag. This is my preferred way of pairing.

Another option that works well is tmate. tmate is a fork of tmux that makes remote pairing easy. It makes it dead simple to have remote developer connect to your machine and share your terminal. This means you are stuck using tools that work in a terminal and, if you are working on a user interface, you need to share that some other way. There generally is less lag when the remote developer is typing.

A third option is to have the host programmer share their screen using screen sharing built-in to Google Hangouts or Zoom. This is a quick way to share a screen and is my preferred way of sharing GUIs with more than one other person. With both Zoom and Google Hangouts the remote developer can control the host’s machine but it isn’t a great experience. If you are pairing this way the remote developer rarely touches the keyboard.

Soloing

It might seem weird to have a section on soloing in an article about remote pairing. Soloing happens and even in an environment that almost entirely pairs it is important. Not everyone can or wants to pair 100% of the time. Soloing can be recharging. It is important to be self-aware and recognize if you need solo time. Below are a few tips for getting that solo time.

One way to introduce solo time is to take your lunch at a different time than your pair. This provides both of you and your pair with an opportunity to do a bit of soloing.

Other short soloing opportunities happen because of meetings and interviews. It isn’t uncommon for half of a pair to leave for a bit to join a meeting, give an interview, or jump over to help out another developer for a bit.

Soloing also happens as a result of uneven team numbers. If your team is odd numbered than there are plenty of opportunities for being a solo developer. Try to volunteer to be the solo developer but be aware of becoming too isolated.

Conclusion

Remote pairing works. Working at Outpace has shown me how well it can work. Reasonably fast Internet paired with modern tools can make it seem like you’re almost in the same room as your pair.

Overview of my Leiningen profiles.clj

2017-08-27: I’ve published an updated version here.

Leiningen, a Clojure build tool, has the concept of profiles. One thing profiles are useful for is allowing you to have development tools available to a project without having them as dependencies when you release your project. An example of when you might want to do this is when you are using a testing library like expectations.

Some development tools, such as lein-test-refresh, are useful to have across most of your Clojure projects. Rather nicely, Leiningen supports adding global profiles to ~/.lein/profiles.clj. These profiles are available in all your projects.

Below is most of my profiles.clj. I’ve removed some sensitive settings and what is left are the development tools that I find useful.

Entire :user profile
1
2
3
4
5
6
7
8
9
10
11
12
13
{:user {:plugin-repositories [["private-plugins" {:url "private repo url"}]]
        :dependencies [[pjstadig/humane-test-output "0.6.0"]]
        :injections [(require 'pjstadig.humane-test-output)
                     (pjstadig.humane-test-output/activate!)]
        :plugins [[cider/cider-nrepl "0.8.2"]
                  [refactor-nrepl "0.2.2"]
                  [com.jakemccrary/lein-test-refresh "0.5.5"]
                  [lein-autoexpect "1.4.2"]
                  [lein-ancient "0.5.5"]
                  [jonase/eastwood "0.2.1"]
                  [lein-kibit "0.0.8"]
                  [lein-pprint "1.1.2"]]
        :test-refresh {:notify-command ["terminal-notifier" "-title" "Tests" "-message"]}}}

:plugin-repositories [["private-plugins" {:url "private repo url"}]] sets a private plugin repository. This allows me to use Outpace’s private Leiningen templates for setting up new projects for work.

The next few lines are all related. They setup humane-test-output. humane-test-output makes clojure.test output more readable. It makes using clojure.test much more enjoyable. I highly recommend it. Sample output can be found in my Comparing Clojure Testing Libraries post.

humane-test-output setup in the :user profile
1
2
3
:dependencies [[pjstadig/humane-test-output "0.6.0"]]
:injections [(require 'pjstadig.humane-test-output)
             (pjstadig.humane-test-output/activate!)]

Next we get to my :plugins section. This is the bulk of my profiles.clj.

:plugins section of my :user profile
1
2
3
4
5
6
7
8
:plugins [[cider/cider-nrepl "0.8.2"]
          [refactor-nrepl "0.2.2"]
          [com.jakemccrary/lein-test-refresh "0.5.5"]
          [lein-autoexpect "1.4.2"]
          [lein-ancient "0.5.5"]
          [jonase/eastwood "0.2.1"]
          [lein-kibit "0.0.8"]
          [lein-pprint "1.1.2"]]

The first entry is for cider/cider-nrepl. I write Clojure using Emacs and CIDER and much of CIDER’s functionality exists in nrepl middleware found in cider/cider-nrepl. This dependency is required for me to be effective while writing Clojure.

refactor-nrepl is next. clj-refactor.el requires it for some refactorings. I actually don’t use any of those refactorings (I only use move to let, extract to let, and introduce let refactorings) but I still keep it around.

com.jakemccrary/lein-test-refresh is next. This lets me use lein-test-refresh globally. lein-test-refresh runs your clojure.test tests whenever a file changes in your project. This is another key development tool in my process.

Up next is lein-autoexpect. It was the first Leiningen plugin I wrote and it enables continuous testing with expectations.

Both lein-autoexpect and lein-test-refresh are projects I created and maintain. Writing lein-autoexpect was my first exposure to continuous testing and it changed how I develop code. I find it frustrating to develop without such a tool.

Next up is lein-ancient. It checks your project.clj for outdated dependencies and plugins. It isn’t something that gets used every day but it is super useful when you need it.

The next two entries are for jonase/eastwood and lein-kibit. They are both tools that look at your Clojure code and report common mistakes. I don’t use either consistently but I do find them useful. I’ve found bugs with eastwood.

The final plugin is lein-pprint. lein-pprint prints out your project map. It is useful for trying to grasp what is going on when messing around with various Leiningen options.

The final part, seen below, of my profiles.clj is configuration for lein-test-refresh. It configures lein-test-refresh to use terminal-notifier to notify me when my tests pass or fail. Using a continuous tester that allows flexible notification is useful. Not having to glance at a terminal to see if your tests are passing or failing is great.

1
:test-refresh {:notify-command ["terminal-notifier" "-title" "Tests" "-message"]}

That is my ~/.lein/profiles.clj. I don’t think it contains anything mind blowing but it definitely contains a useful collection of Clojure development tools. I encourage you to check out them out and to think about what tools you should be putting into your global :user profile.